 | NARAM-46
The National Association of Rocketry’s Premier Event | |
SportScale
Sport Scale provides the challenge of using one'scraftsmanship to construct a nice looking scale model of a realrocket. The competition goes beyond looks, as entries are also judgedon their flight characteristics and lack of post-flight damage.
The Sport Scale model must be based on an existing or historicalguided missile, rocket vehicle, or space vehicle.
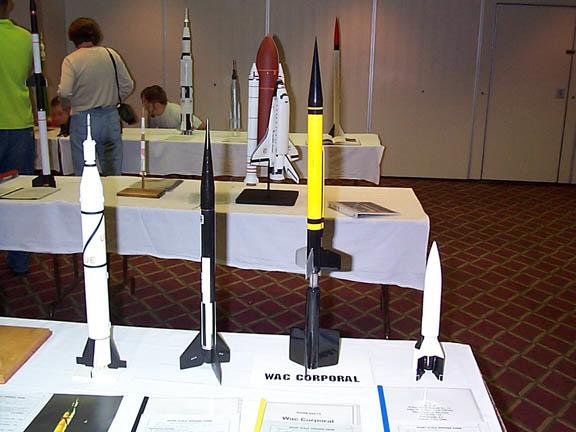
If the real rocket was staged, the model has to have all thestages. For example, the WAC Corporal was 2-staged, so an entry thatmodels just the upper stage by itself is not legal for the event.Same goes for the Navy's sea-launched versions of the "Tomahawk"cruise missile. Models of those need to include the rocket boostersthat got them airborne. A model of a multi-stage rocket does not needto actually stage. For instance, a WAC Corporal with a single enginein the (first stage) booster is fine.
Sport Scale entries cannot exceed 1500 grams (approximately 3.3pounds) mass at liftoff.
Each entry must make at least one safe and stable flight (twoflights are allowed), otherwise the model is disqualified and thestatic score is useless. The model can be clustered or staged (stagesneed to recover in a safe manner: a Saturn-V first stage tumbling tothe ground "like the real thing" would be disqualified). Clusteringor staging is not recommended for inexperienced fliers.
Entering for judging: Turn-in for static judging will beSunday night. The model needs to be entered in the same condition itwill be for flight. No parts may be added or removed between judgingand flying, other than internal parts such as the recovery system.Your NAR number should be on the model. Many contestants use decalsor dry transfer numbers for this. A display stand of some type isuseful, but not required. The stand is not judged but is nice to keepthe model from falling over , and it helps present the model at adesired viewing angle.
Scoring - For Sport Scale, the model is judged in advanceto arrive at a static score. The static score is based onCraftsmanship and Difficulty. When flown, it is also judged forGeneral flight points (including lack of flight damage), and"Mission" points. The model is allowed to make two flights, the bestsingle qualified flight score is used. The final score is a total ofthe static score and the best flight score.
Engines - You can use any NAR ContestCertified engine that is suitable, considering the weight anddrag of your model and the time delay to ejection. However, themaximum engine total impulse allowed is 160 Newton-Seconds (Full Gpower). The sum of the total impulses of the engines in clusters andmultiple stages cannot exceed 160 N-sec.
For the full rules for this event, please see the SportScale Rules on the NAR web page.
Model choice is important. - What makes a good choice foryou to build for Sport Scale is just that, what will be good forYOU.
If you are not good at masking off corrugations to create blackand white roll patterns, then a Saturn is probably not a good choicefor you to make.
It is nice to choose a model that inspires you to learn newskills. But not if it is going to involve learning a number ofdifferent skills that you won't have time to master well enough tocomplete a good model. Should you choose a model that will involvenew skills and techniques, it is best if you learn those skillsearly. Allow extra time to learn and test them out before buildingthe real model.
Choose something that you feel you can do a good job on. Also, ittends to help if you actually like the vehicle you are building ascale model of.
Try to plan out the time the model will take to complete. Usually,one can come up with a time estimate and then multiply it by 1.5 or 2times, as things inevitably take longer to complete. This can beespecially true when you're learning new methods or trying new thingsfor the first time. It is not good to have a nice model that is acouple of nights shy of being completed in time, or a model rushed tocompletion so that it suffers in appearance. Order any special partsor supplies EARLY.
A list of kits, and list ofdata sources is included further down on this page.
Note that some manufacturers make some kitmodels that look scale-like but are not based on a real rocket. Ifyou are looking for a kit, make sure it is of a real rocket, missile,or launch vehicle. Some manufacturers have made kits of "bombs", butthose are not rockets or missiles, and are not be legal for SportScale. Neither is an SR-71 (it's a jet), while an X-1 or X-15 wouldbe OK as those were rocket powered.
Scale Data - Something to also consider is whether you cancollect enough data to document your model. Sport Scale is a fairlyeasy event to obtain data for, though. The minimum data neededis:
- Outline data - Either a drawing (or set of drawings) that show the outline of the rocket, or one or more photographs sufficient to show the outline.
- Finish, Color, and Markings data - one or more photographs, or one or more drawings, which show the finish, color, and markings.
You might wish to read the SportScale rules for the fully detailed description of the data.
If you are building a kit, make sure that you find the right datato go with it. If the kit does not look similar to the data/photos ofthe real thing, then warning bells should go off. It may be the kitis wrong, or that the kit is OK but is of a mission or version thatis different from what the data represents. Or, the kit may be"semi-scale", not as accurate as one might desire.
Rockets on static display (such as at museums) are too often poorsources of documentation. Many are not painted correctly, and somewere not even assembled right. It's best to go with data and photosbased on the real thing that flew, if at all possible.
Don't get too hung up on the data part, though. If you arebuilding from a kit, almost surely there are plenty of drawings andusually photos that you can obtain if you look hard enough. Alist scale data sources is included further downon this page.
Building from scratchIf you do not build a kit, here are some tips to keep in mind.
What size? - First, determine what scale to build themodel. You may have in mind what general size you want to build,regarding length or diameter, so choose a ballpark size and then seewhat scale ratio would give you a model of that size. Also considerthe weight and engine power (more later).
There is a very handy Body Tube diameter & ratio chart on theWOOSH section's website (PDFversion, Excelversion). It lists a lot of tube diameters which are available frommany different vendors.
Looking at the scale data, divide the real rocket's diameter bythe diameter of the body tube you have in mind. For example, a 16.5"diameter for the real rocket, and 1.637" for a BT-60. The resultingscale would be 1 to 10.079 (or 1/10.079). Well, after primer andpaint, that BT-60 will be larger than 1.637", and this is sportscale, so the scale for such a model might as well be rounded to1/10.
If the rocket has more than one body tube diameter, you may haveto reconsider the scale until you find two (or more) tube diametersthat match up closely enough to look right. You could also considermaking a custom tube, or to resize an existing tube to a smallerdiameter. See the tipfrom John Pursley on reducing a tube's diameter.
So, having determined what scale the model will be, divide all ofthe dimensions of the real thing by the scale factor (in this case10). It helps to use a photocopy of the original data so you canwrite in the model dimensions. Now, some data sources do not listdimensions directly, but as "Station Numbers" (often with a "STA"prefix). So you have to work out the particular dimensions betweenany two given station numbers. It's not hard, just different. Here isa drawingfor a Saturn-IB, at 1/66 scale, which is a good example ofstation numbers and the dimensions that were derived from thosenumbers. This particular drawing shows both the original full sizedimensions, as well as the 1/66 scale dimensions (Full sizedimensions were derived frist, from the STA numbers. Then the 1/66dimensions were derived from the full size dimensions).
This being Sport Scale, the model won't be measured. But you needto work out the dimensions, and keep track of them for your workshopreferences, so you can build it accurately enough to look right. Goover the numbers again, as a "sanity check", to make sure you didn'tmake some calculation error that may not be obvious until it is toolate.
Nose cones & adapters - Are there any commercial nosecones that will work for the model you are planning? Some companiesmight offer the right shape, but only for certain diameters of tubes.So if you want to use those noses, you'll have to base the scale ofthe model on the tube diameter that fits that nose. Same thing foradapters/reducers.
For totally custom parts, you can turn your own nose cones oradapters using a simple lathe or even an electric drill. But that isnot as necessary to do these days, thanks to the emergence ofBalsa Machining Service(BMS). They make custom nose cones, adapters, and nose blocksto order. Check out the order form on their site as to the differentshapes they make. They also do custom laser-cutting work.
If you would like to have lightweight hollow plastic parts , youcould consider vacuum-forming. Here is an article on how tomake your own simplevac-former.
Here are tips from Peter Alway, on how to calculatean adapter shroud (for thin cardboard or thin plastic), and forcuttingbody tubes (A fresh single sided razor blade is preferred bysome, instead of a model knife).
There is also Robert Blaske's online ShroudCalculator on EMRR (uses Javascript).
Just recently, Steve Humphrey released his PowerPoint-basedshroud/transitionmaker.. It will calculate and generate patterns, including foroffset and complex shapes such as the Nike-Hercules and X-17.
Mass and thrust: The model won't go very high if it's tooheavy for the engine it's flying on. Some scale models can be heavyfor their relative size, and some require additional noseweight.Estimate the weight of the completed model, ready to fly, anddetermine what kind of engine necessary for the job based on othermodels of similar weight and drag.
The thrustline should be through the center of gravity of themodel, or very close to it. If not, the model will pitch over underthrust. Fortunately for "normal" rockets this is simple, thecylindrical body of a Saturn-V-type model means the center of gravitywill be in the center of the body. But something like a spaceshuttle, with the orbiter offset on one side, calls for a veryspecial thrustline layout.
Clustered models have a bigger problem. All the engines mustignite at the same time or the model may pitch badly at liftoff,which may cause it to crash.
The same can be said for the risks of staging scale models. So,clustering or staging is not recommended, unless you have lots ofgood experience, ideally including boilerplate testing.
Stability: Some scale models need help to be stable. Theeasy way is to add noseweight (such as clay, or small lead fishingweights embedded in clay), which is fine for some models. For othermodels, the engine may not be able to lift any additional weight, orthere may not be room to add noseweight. The fins may be too small,or non-existent, so the fin area must be increased. However,noticeably increasing the size of the scale fins will give the judgesreason to take off points from the outline score.
So, if a model really needs to have more fin area, clear plasticfins may be the way to go. Some kits like the old Estes Space Shuttlestack, and Titan-IV, used plug-in opaque fins painted black (plugginginto the bottom of the SRB's). Judges almost always take offsignificant points for models whose fins are done that way.
Clear fins are notoriously difficult to glue on neatly and maskoff for painting, so this is not a good route for the lessexperienced. If you choose to use clear fins, you can get the 0.04"clear plastic made by Plastruct. That clear plastic is a bitflexible, this is not a problem for small fins but can be for largefins. If flexing is a problem, try to find cheap clear plastic boxesto cannibalize for stiff clear fin material. However, one of the mostideal clear fin materials is Lexan (aka Polycarbonate). You can find1/32" and 1/16" thicknesses of it sold by Micro-Mark. Do not useCyanoacrylate to attach clear fins. It does not work well, and itoften frosts up the plastic. It is not easy to glue clear fins torocket body tubes. Even epoxy does not really bond well toplastic.
If you have the skill to do it neatly, and if the model issuitable, you can use the slot and tab method with the clear fins.Perform the following steps before you glue in the engine mount. Youmay need to plan a careful assembly sequence in order to do this.
Cut the fins with a tab in the root meant to fit into a slot inscale model's body tube. Use great care in cutting out slots that areexactly the width of the fin thickness, or perhaps a hair undersize,then file slightly wider as needed. Drill a few holes into the tabportion of the clear fin, so you can epoxy the fin into the tube,with the epoxy on the inside of the tube. The holes in the tabs willallow the epoxy to grab into the holes like rivets (this is a methodbest tested out first with scrap plastic and tubing). Mask off thefins very carefully so that paint won't creep onto the clear fin.
Boilerplate testing - If you are going to make your ownscale model from scratch, not a kit, this can be very important. Themore difficult or complicated the model will be, the more you oughtto consider testing a boilerplate model. Given the aboveconsiderations, you've chosen a model and are ready to put your ideasand plans into action by building. But will the model really work?Would you like to know for sure your scale model will work beforebuilding a detailed pretty model? It's highly recommended to build a"boilerplate" model first and find out. This means you make a simplemodel that is basically like your final scale model, but it can bebuilt more simply and quickly. Don't paint it or worry about details,or any time-consuming things that are not relevant to testing out theflying qualities. Then fly it, and see if it works. If it crashes,you saved a lot of time and effort, and might be able to determinehow to solve the problem if you want to try again. If it works,great, you now have the confidence to invest that time and effort.Here's an example of a boilerplatetest flight for a large clustered Little Joe-II.
More general tips for all models, kit orscratch builtTime management and planning - This was mentioned before,but bears repeating. However long you think it will take to make ascale model, it will take longer. So try to allow for more time tobuild it, if at all possible. Anything new....test out the techniquesin advance if you can, so you can avoid messing up the real model. Ifsome method just won't work at all you can plan for an alternativewithout being stuck in the middle of building the model.
Kit upgrades: A half measure between building from scratch,and doing a kit, is to get a kit that may not have much detailing toit or parts that are not quite accurate, and add your own extradetailing or improved parts. Same for upgrading the markings,including replacing stick-on decals with water-slide type decals.
As well, a kit based on one round or mission might serve as thefoundation for significant modification to a different one. Such as aBumper-Wac (V-2 with Wac-Corporal upper stage) or a SkylabSaturn-V.
Custom Decals - TangoPapa Decals offers a variety of decals for certain scale models,at almost any desired scale. They can also do custom decal work, andsell blank decal paper. Highly recommended.
Some people make custom decals, printing them on inkjet printersor color copiers. Micro Mark sells blankdecal paper meant for inkjet printers, and another type of blankpaper meant for color copiers or laser printers (they have both clearsheets, and white sheets). Be sure to buy a can of clear "fixative"to overcoat the decals, especially the inkjet type since without theclear coat, water will make the inkjet ink run. See Micro Mark'sinstructionsfor decal paper.
Finishing: Craftsmanship counts for 300 out of 800 totalpoints in static scoring. That's a lot. There's an all too true storyabout spending weeks (or longer) building a great model, and messingit up in ten seconds during painting.
Try to fill the body tube spiral seams, as visible spiral seamswill cost points. One way to do this is to use masking tape to maskoff the whole tube EXCEPT for the seam (if the seam has a 1/16" gap,then there should be a 1/16" gap between the making tape on each sideof the seam). Then use a good primer to spray a coat that will goonly into that seam. Some builders like Plasti-Kote SandablePrimer--available at auto stores--as it is easy to sand. Others havesuccess using Krylon's white sandable primer, which is more easilyobtained but can have problems with clogging up the sandpaper tooquickly.
After letting the primer dry fully, apply more coats (letting dryfully between coats) until the buildup of the primer will be tallerthan the seam recess depth was. Then remove the masking tape andapply a couple of coats of white primer to the whole tube. The primerpaint filling the seam should be visible as standing above the restof the white primer on the tube. Use sandpaper to knock down theprimer covering the seam and make it flush with the primer on therest of the tube. Don't overdo it. When the seam is pretty muchflush, give the whole tube another coat or two of white primer andsand the whole tube until it's uniform, no hint of the seam left.
If the fins, nose, or other parts are wood, try your best to fillall of the wood grain. Try to make you model's fin shapes like thereal rocket's fins. Make sure that sharp leading edges are sharp,blunt edges are blunt, straight edges are straight, and so forth.Some people do not use even wood fins, they build them up out of thinplastic or other suitable materials that will give the best endresult.
Always test out any new paints, and new methods you plan to do,first. So if some paints do not react well, you can learn thatwithout messing up the model. This is also true for decals,especially decals and clear coats. Some clear coats can actuallyattack decals, others do not hurt the decals, but make the clear filmvery visible rather than disappearing.
Paints for plastic models are usually good for scale rocketmodels. Spray cans are typically used. An airbrush is nice butoverkill for many basic model's needs. If you want a flat finish butwill be using decals, use gloss paint(s) first, apply the decals,then apply a flat clear coat. Otherwise, decals applied over flatpaint look "silvery" in the clear areas of the decal. Anytimedifferent paint types are used, do a test first on some scrap plasticor other material. Some paints are not compatible with other paints.Carefully applied scotch "magic" tape can work well for some simplemasking jobs. After applying the second color, remove the tape maskabout 30 minutes later, before the new paint gets "hard", so the tapewill come off without bringing chipped flakes of the dried secondcoat of paint.
Decal application - Setting solutions make application andfinal positioning of the decals easier. Tango Papa decals are easierto apply when using a setting solution. Use a setting solution tohelp you slide the decals into place. Setting solutions provide a"wet" film surface on the model that the decal can slide on, so youcan manipulate the decal into the right spot using a small cleanmodel brush. Do not confuse setting solution with decal softeningsolutions. Softening solutions make the decal film pliable so it cango over complicated surfaces (like recessed panel lines or evencorrugations), but for most model work the accidental use of asoftening solution can risk damaging the decals (unless you know whatyou are doing). Test out the use of a setting solution with scrapdecals to get the hang of doing it. Acetic acid--white vinegar--is agood (and cheap) setting solution.
Recovery system: | It is important to have a good strong reliable shock cord and parachute system for the model. Some scale models are heavy and tend to stress the recovery system a lot at deployment. Not surprisingly, the shock cord should be able to absorb shock. Elastic is good for this. For models of 4-6 ounces, 1/8" elastic is adequate, for heavier models 3/16-1/4" elastic is better. The more length, the better the elastic can absorb the shock when the chute deploys, but do not use so much that the recovery compartment tube is crammed. For larger scale models, some use light-weight 1/4" tubular nylon, or the smaller tubular Kevlar. These absorb the shock (by heating) with essentially no snap-back. Do not use cord-type Kevlar, as it does not absorb shock significantly. Z-folding the shock cord, taping each fold to the bundle with one wrap of masking tape, can add to shock absorption if done the right way (and is a clean way to pack the cord). Parachutes need to be able to be stored small, deploy well, and hold up without ripping or losing shroud lines. Cloth chutes are great for strength, but depending on the size of the model such chutes can take up too much space in the body tube. Mylar chutes can be packed very small and tight. However, they can rip easily and sometimes do not deploy reliably. Therefore mylar chutes really should be avoided for scale models. Commercial plastic chutes are suitable for many small and mid-sized models, but need to be reinforced. For a 6-line chute, replace the 6 lines with 3 very long lines, and run them across the top of the chute as shown at right. Use extra tabs to secure the lines across the top near the center. This ensures that no lines will pull out. | 
click drawing to see at twice size |
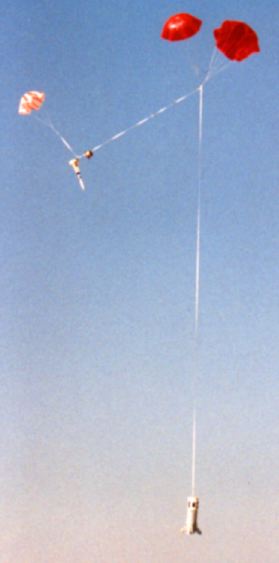
| Chute size is a judgment call. The larger the chute (or chutes), the softer the landing...unless it's so big that it gets jammed inside and the model crashes! Smaller chutes cause harder landings, but are more reliable. Experiment with packing chutes in the tube you're using. If you are not able to blow the chute out using lung power, go to a smaller chute or try a different way to pack the chute. And when it comes time to fly, remember to pack the chute the same way! Consider using more than one chute, it may be easier to fit in two smaller chutes than one larger one, and if only one of those two opens the model won't crash. At right is a photo of a Little Joe II model using several parachutes and a very long shock cord. Two main chutes, plus a third smaller one for the nose section. They are all linked together. The model had limited chute srorage space. So the main chutes were packed inside first, and the nose chute packed in last, so it would be the first to some out at ejection. So, if the mains were not ejected out of the main body, the nose cone's chute would act like a drogue chute to yank out the mains. This "semi-drogue" parachute arrangement (everything linked, nose section chute packed to easily come out first at ejection) is very reliable. The method was inspired by some scale models that come down in separate pieces, only to sometimes have the main body's chute jam in the tube and plummet to the ground - with the nose section gently descending by itself, almost mocking the fate of the crashed main body. | 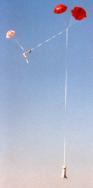
click on thumbnail
|
Entering & FlyingEntering for judging: Turn-in at NARAMs is usually Sundaynight. If you can not make it in time, someone else can turn it infor you. Contestants have sometimes even shipped models by UPS orFedEx, carefully packed.
- The model needs to be entered in the same condition it will be for flight. No parts added or removed, other than internal parts such as the recovery system and engine(s). Your NAR number should be on the model, many people use decals or dry transfers.
- A display stand of some type is useful, but not required. The stand is not judged but is nice to keep the model from falling over, and it helps present the model at a desired viewing angle.
- Submit your data pack with the model. Include your NAR number with the data so the judges will know whose model it belongs to. Additional information is always useful. You can include information about how the model was built, as it might not be obvious to the judges how difficult it may have been to build the model or to add certain details, markings, or paint schemes.
Flight Points - When the model is flown, it will be judgedin two ways. To quote from the rules:
| General Flight - 100 points max. "General Flight points are awarded for proper operation of the model during flight, including launch, lack of misfires, stability, recovery, and lack of damage on landing. No consideration should be given to staging or scale-like flight characteristics, as these are covered under Mission points; however, if the general flight performance of the model is adversely affected by the failure of one or more of these aspects, points may be deducted from General Flight." Mission Points - 200 points max. "Mission points are awarded for appropriate and scale-like operation of the model during flight. Examples of such operations are staging, simulated cloud seeding, operation of electronic payload, and smoke ejection. Any such operation must comply fully with the safety standards set forth in this NAR Sporting Code. If it does not, the entry shall be disqualified. The RSO is the only official who may judge the safety qualities of the operation." |
The General Flight points are pretty basic. You want the model tofly well, hopefully straight up without spinning or wobbling, withgood deployment of the recovery system and a soft landing. Prettymuch like you want with any model rocket you fly, just this time it'sactually judged for how it's flying.
Mission points are where people get inventive. Some do clusters,some do stages. Of course, clustering or staging can be quite riskythings to do. Altimeters and other devices have been flown tosimulate a payload like the real thing flew. But it has to be basedon things the real rocket did. If the real thing did not use acluster of engines, then you won't get any mission points if youcluster your model.
If your model flies well, and you do not think it would get abetter score if it flew again, then you do not need to fly again. Ifit didn't fly well, or got disqualified, but was in the running for atop score, try again. If it crashed and was in the running for a topscore, try a "Humpty Dumpty" repair (rebuild?) session to see if youcan make it flyable again.
Good luck!
click onthumbnails
More Information: - NARscale - An NAR recognized special interest group - Site contains scale data, photos, tips, and many useful links.
- "ScaleRoc" Yahoogroup, the NARscale mailing list which discusses Scale Rocket Models.
- Also see the RMR Scale FAQ (Frequently Asked Questions).
Tips and techniques from John Pursley's Rocketry & Spacemodelsite:
- Organization and Habits - Deciding what to build, how to build it, tracking what you do, and doing it on time.
- Filling Body Tube Spirals - One technique for filling those pesky spiral seams in commercially available rocket body tubes...and it adds almost no extra weight to the finished tube.
- Reducing Body Tube Diameters - Reduce the diameter of a commercial body tube. It's easier than you think.
- Optical Aids - Magnifying glasses, hoods, and lenses will help even the modeler with perfect vision build better .
- The Most Important Rule - "Similarity of Outline" is the most important though most often disregarded aspect of Sport Scale competition.
- Playing the "Grey Area" - The Pink Book's very first rule for Sport Scale does a good job of making the competition all "grey" rather than "black-and-white."
- Get all the Points You Deserve - Scale Documentation is often the weakest link in most Sport Scale entries.
| Data sources - Vendors - Saturn Press - By Peter Alway - By far, the BEST place to look for scale data! Peter's "Rockets of the World" book is in its 3rd edition, with 384 pages covering 200 versions of 139 rockets. All suitable for Sport Scale data, indeed used by a lot of competitors for their scale data packs. There are also supplements covering other rockets, other publications, posters, and two scale kits - the Arcas and Astrobee 1500. Here is a listing of all the rocket data that Peter Alway has created which is in his Saturn Press publications, or is online.
- NARTS - NAR Technical Services has scale data for the Aerobee 350, IQSY Tomahawk, Super Loki Dart, and Sandhawk. The data is in more detail than usually found elsewhere.
- NAR magazine Back-issues - The NAR's magazine (Sport Rocketry now, previously named American Spacemodeling and the Model Rocketeer) has had scale data published in it many times. NARTS sells back-issues, and in cases of originals being out of stock, photocopies. Check out this magazine index, compiled by Lila Schmaker, to see what scale data has been published in the magazine through 1999.
- RealSpace Models - High-Quality Drawings by David Weeks, of Mercury (Little Joe-I, Mercury Redstone, Merc. Atlas), Gemini, Apollo, and Saturn-IB, Saturn-V, and Saturn-V/Skylab. 24 x 36" sheets. Also check out the samples of each page as listed on the Apollo-Saturn.com's "Spacemodeling" page, scroll down to the reviews of David Weeks' drawings to see just how much detail is included. If you're doing any NASA rocket that flew a Mercury, Gemini, or Apollo spacecraft, you may well want to get these drawings.
- Accur8 Spacemodels - By John Pursley. 1/12 scale Mercury Capsule kit (capsule only), Photo sets of JSC's Saturn-V, and Navajo Cruise missile. Saturn-V drawing in 1/40 scale. Custom decal services, and decal paper.
- Advanced Rocketry Group (ARG/Sigma) - Russian Scale Drawings, at 1/50 scale: Intercosmos, Proton KA Phobos-2, & Soyuz KK TM-12. Russian Photograph sets: Intercosmos, Proton-Phobos, Soyuz Joint British Vehicle, Buran-Energia, Soyuz Lift-off.
Data sources - Personal & Public sites - NARscale site - An NAR recognized special interest group. Site contains scale data, photos, tips, and many useful links.
- NARscale's "ScaleRoc" Yahoogroup - Photos and data in the photo and files sections, as well as e-mail communication. Files include American Spacemodeling Little Joe-II data. You have to join the group to access the files & photos.
- Jim Ball's Scale Library of Missile Data - Drawings and photos of various missiles.
- Peter Alway's Sounding Rockets page, Space Rockets page, and Missiles page. - A number of color GIF versions of some of the drawings made by Peter Alway for his books and other published works.
- Peter Alway's Rocket Photos page - many excellent photographs of various rockets. Hosted on Jim Ball's site.
- National Air and Space Museum, Stine Drawings - Line drawings by G. Harry Stine of Arcas, Asp, Astrobee D, Astrobee 1500, Atlas D ICBM, Black Brant 3, Honest John, Mercury Spacecraft, MX-774, Nike-Smoke, Shotput, Hasp, Nike-Cajun, WAC Corporal, Titan III-C, Tomahawk, Vanguard I, Viking.
- Sven Knudsen's Scale Models Page's - Mainly aimed at Plastic models, but includes some scale model rocket information. Lots of links to sites that have photos and other information on lots of different rocket vehicles. Many vendors, personal/club pages, and links to aerospace museums.
- Peter McQuillan's Project Mercury Little Joe page - Site with a lot of great drawings, photos, and movies related to the first Little Joe series that was used for testing Mercury spacecraft.
- JimZ's Rocket Plans site - This is not really a scale data site. It is a site that is mostly dedicated to instruction sheets and plans for a lot of old out of production (OOP) kits from Estes, Centuri, and others. A person might find it useful to see how some old scale kits were assembled, and might make some good use of the scanned decal files from some old scale kits. For example, the stenciled "UNITED STATES" decal used for the Centuri 1/10 Nike-Smoke kit, useful not only for Nike-Smoke models but other multistaged sounding rockets that used Nike boosters (resizing the decal as needed).
- GRIN (Great Images in NASA) - GRIN is a collection of over a thousand images of significant historical interest scanned at high-resolution in several sizes.
- NASA Image Exchange (NIX) - Searchable site that links many NASA sites together for its searches.
- Mark Wade's Encyclopedia Astronautica - Site that has information on almost every space launch vehicle, and many spacecraft.
- Apollo Saturn.com - Information and photos of Saturn-IB, Saturn-V, & Apollo spacecraft. Also check the "Spacemodeling" page for model related info and sites.
- Apollo Archive.com - Photo gallery with many Saturn and Apollo photos. Also some Little Joe-II photos (early Apollo) and photos from the Mercury and Gemini programs.
- V2Rocket.com - "The A-4/V-2 Resource Site". Lots of information, links, and tons of photos.
- Missile.Index - The Illustrated Encyclopedia of the World's Missile Systems - Written text and some limited graphics. Useful to find a missile type to do further research on.
- Directory of U.S. Military Rockets and Missiles - Links to a very large number of military missiles, including many old obscure ones. Each linked page has some information on each missile and usually with a few photographs.
- Nike Missile.org - Nike Missile Historical Society. Check out the links page for sites with numerous photos.
- 1000 Aircraft Photos.com - Links to photos of rockets, including Mercury, Gemini, and Apollo.
- Scale model Index - by Tony Matteliano. A site with hundreds of modeling links, mostly of the plastic model variety. Can be useful for looking for overall modeling tips and sources.
- Gunter's Space Page - Information on Launch Vehicles.
- White Sands' Historical Missiles & Rockets - Information & photos on many rockets that were flown at White Sands.
- Phil Broad's "Real Hardware" site - Incredible number and quality of photos of Saturn S-IV stages, Space Shuttle Atlantis, V2/A4, Wasserfall, Rheintochter, Atlas assembly, & Nike Ajax. Also an Apollo Links Page, a V2 Links Page, and other pages of interest.
Sites featuring contest type scale rocket model projects or tips: - John Pursley's Rocketry & Spacemodel page - Info and photos of many of John's scale projects such as the Mercury-Redstone, Vanguard, and Saturn-V (some which have used vertical guidance systems and gimbaled engines). Great contest and techniques tips, online photos (Saturn-V, Saturn-I, Navajo, Little Joe-II), links, and Accur8 products.
- Sven Knudsen's Model Rocket Pages - LOTS of links not only relative to model rocketry, but for old scale model kits and sites which often include scale-worthy photos and other information on real rocket vehicles.
- Model Rocketry Magazine, on Sven Knudsen's site - Scanned by Jim Hartman, these are pdf's of the October 1968 thru August 1971 issues. Some scale data printed in Model Rocketry included the Astrobee-D by G. Harry Stine. The Rocket Shoppe hosts indexes for MRM's Volume 1, Volume 2, and Volume 3.
- George Gassaway's scale pages - Links to pages with photos and some info about projects including the Space Shuttle, X-1, Little Joe-II, Saturn-IB, and FAI scale. Also an article on how to make vac-formed parts.
- Jeff Brundt's Rocket Pages - Aerobee 150 project, Astrobee D, Black Brant II, Nike Smoke, Sandhawk, Terrier/Sandhawk, Bomarc, Honest John, Pershing 1A, V2, Little Joe, Little Joe II, Mercury Redstone, Saturn 1B, Saturn V, Vostok, Soyuz.
- John Sarosi's Rocket Page - Scale page includes Patriot, Atlas-Centaur, Pegasus, Aerobee-Hi, V-2, Black Brant VB, and other photos.
- James Duffy's Pages - Photos showing the assembly of his 1/12 Little Joe I. Also includes other links of interest.
- David Miller's scale pages - Photos of various scale models being flown.
- Russian N-1 Sport Scale model by Andy Woerner - Photos of a clustered sport scale model of the N-1 Moon Rocket, including launch photos. Note it was boilerplate tested first (brown primer photos). From the "Blast From the Past Rocketry" site.
- Vincent Meen's Space Model Web Page - Static model oriented. Has links to a page with data and photos mostly related to U.S. and Russian Manned spacecraft & launch vehicles.
- Steve Humphrey's Wac-Corporal - Write-up and photos of Steve's 2-staged Sport Scale model built for NARAM-44.
|
Scale Kit Sources
Note that some manufacturers make kit modelsthat look scale-like but are not based on a real rocket (sometimescalled "Pseudo-scale", or "scale-like"). So, if you are looking for akit, make sure it is of a real rocket, missile, or launch vehicle.Some manufacturers have made kits of "bombs", but those are notmissiles, so would not be legal for Sport Scale.
Also note that kits can vary widely as tohow accurate they are. If a company describes its kit as"semi-scale", then it likely is a scale model of a real rocket, butit probably compromises scale qualities and accuracysignificantly.
| Kit sources | Notes |
| Estes | Patriot Missile, Cruise Missile, Bull Pup 12B Missile, Phoenix Missile, Mercury Redstone, V-2, Saturn-V |
| ASP (Aerospace Specialty Products) | Various scale kits, including Corporal, D - Region Tomahawk, IQSY Tomahawk, FOTL, Kappa-7-1, Kappa-9M, RAM B, Rohini RH - 75, RP - 3, Sandia Sandhawk, Sonda II B, Super Loki Dart, and V-2. ASP also has theWac-Corporal, but only the two-staged kits with the "Tiny Tim" booster are legal for Sport Scale. |
| Apogee Components | Highly detailed Saturn-IB and Saturn-V kits, at 1/70 scale. If building the Saturn-V, keep in mind the 1500 gram and 160 N-sec limits. |
| Aerotech | IQSY Tomahawk and Astrobee-D kits. |
| Saturn Press | Two kits designed by Peter Alway: Arcas and Astrobee 1500 |
| Cosmodrome Rocketry | Kits: Nike Smoke, Nike Apache, Vostok, Black Brant II, Aerobee Hi |
| Sigma Rockets - Black Brants - ARG | Black Brant 1/10 scale models by Taras Tataryn of ARG. BLACK BRANT series - I, IIB, III, IV, V, VA, & VC |
| Scale Kits | Missile Kits: Alarm, AMRAAM, Bull Pup, Guideline, Lance, Little John, Sea Sparrow, Sidewinder |
| Neubauer Rockets | Various scale kits including Mercury-Redstone, Mercury-Atlas, Gemini-Titan, and Juno-I |
| The Launch Pad (TLP)
It is highly recommended to buy TLP kits from dealers, such as the partial list below: | Missile Kits:Alarm, AMRAAM AIM-120a, Anubis, ASM-1 (Type 80), ASRAAM, Bolo, Bullpup AGM-12B & 12C, Dragonfly, Exocet Am.39, Falcon AIM-4C, Flail, Folgore, Gabriel III/AS, Gecko, Grail SA-7, HARM, Harpoon AGM-84a, Hawk Mim-23a, (Improved) Hawk MIM-23B, Hellfire AGM-114a, Indigo, Kormoran AS.34, Krypton, Lance Mgm-52, Martel AS.37, Martin Pescador, Matra "Magic" R.550, Matra Super 530d, Maverick AGM-65b, Nike Ajax Mim-3A, Osiris MPM, AC-3, Perseus, Perseus II, Pershing MGM-31A, Phoenix AIM-54C, Rapier, Saab 372 (RB 72), Saab RB 05A, Scimitar, Seawolf, Sidewinder, Sparrow AIM-7F, Standard AGM-78, Tan-Sam (Type 81), Type 30 Artillery Rocket.
Launch Pad Plan-Paks - Guideline SA-2, Nike Hercules, Scimitar, Scud-B (SS-1C), Standard RIM-67A, Warlock. |
| True Modeler's Rocket Kits | Scale kits of the NASA Scout, Aries "Fat Albert", Juno 1/Jupiter C, and NIKE Smoke. |
| Accur8 Spacemodels | By John Pursley. Incredibly detailed 1/12 scale Mercury Capsule kit (capsule only). |
| Rocket R&D | Have scale & semi-scale kits. The 2.6" kits include Army Hawk, Jayhawk, Sandhawk, & Standard ARM. Some of the 3.9" kits, aimed at higher power, may be too big to make it under the 1500 gram limit. |
| Missile Works | Kits: Sandia Tomahawk, Black Brant III, Zimcor VIPER, MGM-52A Lance, XM-47 Little John, RV-A-10 Sergeant |
| QUEST | Nike-Smoke kit. Unfortunately the new Quick-bulld version seems to have a black body tube, with white UNITED STATES decals, which is not correct. Painting the black tube white would be difficult to get as white as the other parts, and would need custom decals. Available from various dealers, including Pratt Hobbies. (Google search for Quest Nike-Smoke kit dealers) |
| | |
returnto top
Last Updated 4/14/2004
