| | | |
| Orbital SkyDart Project |
 |
| | | |
| Orbital SkyDart Project |
 |
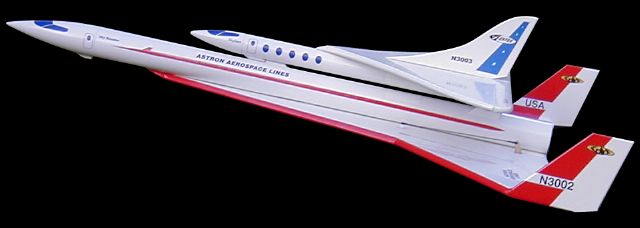
I've been wanting to build a big sport model using the "originalconcept" for the Space Shuttle. A winged flyback booster, plus wingedorbiter of course. No ET, no SRB's. Both gliding back, both R/C.
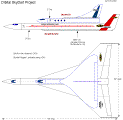
I decided for practical reasons to not build it all from scratch,since it would mean building two new separate R/C models. So, theSkyDart 2X model from 1999 was selected to be used as the "orbiter".There is more info about the SkyDart2X model at this link.
 |  |  |
| | | |
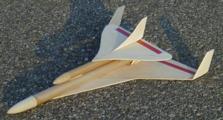
With the SkyDart chosen as the orbiter, that freed up the flybackbooster design to be of a style of other Estes/Centuripseudo-scale/fantasy kits of the SkyDart's era (Also by borrowing acertain old Estes kit's markings). The flyback booster wing designwas a swept double-delta similar to a model I had made in the 1970's.A canard was considered, but ultimately dropped. Twin rudders at thewingtips were chosen to keep the rudders clear of the SkyDart and toimprove yaw stability while hopefully avoiding yaw/roll couplingproblems.
The winged booster originally was going to use 4.6" tubing, oldNCR Shuttle ET tubing. And a vac-formed ET nose. But as the raw partswere being gathered up and weighed, it looked like the model might beunlikely to make it under the 1500 gram target weight (being under1500 grams would allow it to be entered in the "ImaginationCelebration" event at NARAM-46). As well, the vac-formed ET nose wasgoing to be pretty fragile, a poor landing would have crushed it.
So, the winged booster's nose and tubing was changed to 3". AnEstes "Big Daddy" nose and LOC 3" tubing. Unfortunately the LOCtubing was more like 3.0" inside diameter, not OD, so a 3/8"lengthwise gap was cut out of it then spliced back together to makeit 3" OD to match the nose cone. Before that was done, the very heavytubing was peeled to reduce weight. One 34" tube was peeled to cutthe weight from 240 grams to about 120 grams. Another 34" tube waspeeled even more, down to about 80 grams. The 80 gram tube was usedfor most of the main body, with 12" of the 120 gram tube used for thefront section since the front section ahead of the wing is what has alot of stress on landing.
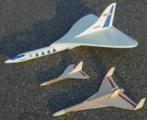
Before the project got any further, boilerplate testing wasneeded. A 1/3 scale boilerplate of the winged booster and Skydartwere built (Technically a 2/3 scale of the original SkyDart, but 1/3scale relative to the 2X Skydart). A series of hand throws worked outthe glide CG location for the winged booster. After that, attachmentswere added to the booster to mount the SkyDart to it. The SkyDart waslocated so its glide CG was dead even with the glide CG for thebooster. This was done so that if the SkyDart 2X didn't come off(didn't "stage"), the combination of the winged booster and SkyDart2X could glide back down under control. The winged booster used aninternal pop-pod system to add noseweight and hold down the elevator,like the original SkyDart used. The boilerplate SkyDart did notglide, its elevator was taped flat and it was rigged not to separatefor the flight tests.
 |  |
|
|
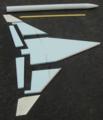
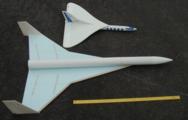
With the boilerplate testing done, main construction continued forbuilding the full sized winged booster. 3/4" thick blue foam was usedfor the wings. Since the model has to be shipped, the outer wingpanels were cut off and a wing joiner system added to them. Since theblue foam leading edges would be pretty badly dinged up on landingfor a model of this size and weight, pre-shaped balsa leading edgestock was used. The rudders are 3/16" thick medium-light balsa. Whenthe rudders are glued on, some fiberglass cloth will be added toreinforce the joints.
 |  |  |
| | |
The servos for the booster will be Hobbico CS-35MG servos. Theyhave a lot of torque but are not as big and heavy as full sizeservos.
Engine power for the booster, two G12 clustered reloads. If onedoes not ignite, the model will definitely be in trouble. It may belaunched at 45 degrees so that if only one lights, there will be achance of getting it into a safe horizontal attitude then make ashallow climb.
The SkyDart might use a D12. An E6 might also be possible, thoughignition will not be as straightforward. The SkyDart's engineignition will be under control of the person flying the wingedbooster, using the Transmitter's trainer switch (spring returntoggle).
| July 5th update: The booster was completed enough to test fly - lacking decals, some markings, and some of the in-flight staging details. The model came in light enough to add a water ballast system to the nose cone to counteract the propellant burnoff, as with the X-1 model. The first test flight was all-up with the SkyDart 2X set up for a captive flight, to test the boost with two G12 reloads. The first attempt was half misfire, half ignition. Only one G12 lit. Fortunately the model stayed in the tower. For the second attempt, two ignitors per engine were used. Both ignited, and the model took off well. It was easily controllable, near the end of the boost I wished I could have ignited an engine in the SkyDart, but that will have to wait for NARAM (for a 2nd pilot). After transition, the glide elevator trim was adjusted so the combined model could glide well. Some left aileron trim was also added, as the model had tried to roll to the right a bit on boost. It was easily controlled to a safe landing. The glide CG seemed to be just about perfect, validating the 1/3 scale boilerplate's CG. Another flight was made, using the booster only, without the SkyDart, to check out the glide trim and handling of the booster by itself. First attempt was with a single F16 reload. It didn't light too well, finally getting enough thrust to leave the tower. The combination of too little airspeed and being extra nose heavy (since the water takes 12 seconds to drain out and a burned out G12 was in the second mount so the model would have the correct glide CG) allowed the model to get horizontal and hit the weeds. It was pretty close though to almost catching itself into pure horizontal flight at 2 feet off the ground, where after building up a little more speed it could have then been climbed upwards. Fortunately there was no damage, thanks to the very very shallow angle (so shallow the nose cone did not dig into the ground) and flying into the weeds. After checking it over to confirm it was OK, another flight was made using a G25. That took off great - plenty of speed but not too much speed (A G40 would be too much.). After transition, it went into a nice glide, much better than when gliding with the SkyDart 2X on its back. So, the flight testing is done. Time to add the decals, markings, and button up other little details to make it ready for the 2-stage flights at NARAM-46. And to get on to making contest models...... | The obligatory |
July 10 update: All finished up. Including the OrbitalTransport style decals and markings. Last pics before the model getsdisassembled and boxedup.
NARAM-46 flights
| The photos below are by Chris Taylor, from his NARAMlive.com website, unless otherwise noted. The 1/3 scale boilerplate was flown Saturday. The SkyDart coming off at ejection to glide back as well as the Sky Booster gliding back. The first all-up staged flight of the full sized Orbital SkyDart was planned for Saturday at NARAM, but it was way too windy. So it was pushed back to Sunday afternoon, for the Imagination Celebration qualification flights. The SkyDart made three trim/practice flights by itself, the last one flown by Bob Parks. But before the whole Orbital SkyDart model could be prepped, the rest of the day was rained out. Monday was too contest-intensive (with three duration events), and Tuesday had no flying. So, the first flight was Wednesday morning as soon as it could be prepped. | 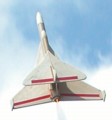 |
The pilot for the SkyDart was Bob Parks, who commutes frequentlyfrom California to Virginia to work for John Langford's AuroraFlight Sciences company. It was really great to be able to haveBob involved in flying this project, given that he is one of theearly R/C RBG pioneers from the MIT Rocket Society, the first R/CScale model at an FAI World Spacemodeling Championships (X-2 in1978), and his full-scale work thru the years ranging from the F-117project, man-powered aircraft, and more recently at Aurora, designingtest models and full sized prototypes for winged aircraft to fly inthe Martian atmosphere, the MarsFlyer.
The first flight used an E6 in the SkyDart. The combo took offwell, and at liftoff Bob counted down from six so that the SkyDart'sE6 could be ignited 1-2 seconds before the two G12's burned out. Thesky was hazy and at first it seemed like the SkyDart had not staged,then a separate smoke trail could be lightly seen (E6's usually donot leave a visible trail, but it was humid). I didn't see what wasgoing on with the SkyDart, needing to fly the Sky Booster. Turned outBob Parks had not seen it for a few seconds either, a combination ofthe sky conditions (white on white is not so visible) and distance.It turned out the Sky Booster was a bit tail heavy, and got into astall which made things a lot worse when the removable engine mountslid half-way out to make it even more tail-heavy. It ended up with avery hard landing, no major damage but putting a slight spiral crimpinto the 3" body tube. Bob had no problem flying the SkyDart once hegot it in sight, flying it very well and doing a 360 degree rollbefore landing. The Sky Booster had a bit of noseweight added to it,as well as adding some masking tape to improve the friction fit (the3" tube had swelled a bit in the humidity)
The Imagination Celebration finals was flown a bit after 5:30 PMWednesday. It started drizzling, then lightly raining for awhile,some of the fliers flew in it. Fortunately the rain stopped (forawhile) by the time the Orbital SkyDart flew. Again, Bob Parks wasthe pilot for the SkyDart. The liftoff was good, but got a littlesquirrely in roll. Later review of photos and video showed why, theSkyDart was not attached properly to both of the aft mounts, it wastilting. The boost was easily controllable anyway.
Bob had suggested igniting the SkyDart's E6 at four or fiveseconds into the boost, so it would not be quite as high as before.At first it seemed like it had misfired, as the switch was thrown butthe SkyDart didn't stage. Then as the G12's burned out, the SkyDartseparated, and burned for about 4 seconds or so. So, the SkyDart's E6had ignited on time, but it didn't have the "oomph" to push forwardoff of the Sky Booster. At any rate, the Sky Booster was flown backunder good control thanks to the added noseweight, and Bob Parks flewthe SkyDart near the booster for a bit. When the Sky booster landed,Bob flew the SkyDart past it doing a 360 degree roll, then landed itnear the Sky Booster.
 |  |  |  |
| | | | |
It seems like the improper attachment of the rear fuselage of theSkyDart added some extra friction and drag that the E6's thrust spikewas unable to overcome on that flight. After evaluating the situationlater, it made sense, the sustainer thrust of an E6 is not enough tomake the SkyDart fly faster than the Sky Booster on two G12's. So forfuture "staged" flights, the SkyDart will need more thrust, such as aD11-P or an E9-P. But E6's are still a good option for air-startedflights, where the whole model would be put into a stable glidebefore the SkyDart's engine would be ignited (See the R/CRBG Safety Code regarding air-start procedures from levelglide).
The Orbital SkyDart didn't take either of the top two places inthe Imagination Celebration event. The wimpy "staging" didn't helpthings.
Friday at NARAM-46:
I had planned for the Orbital SkyDart to fly a lot more than twiceat NARAM, but the weather sure didn't cooperate. Friday, when Scale& PMC were flown, it was pretty windy, but there were occasionalmoments of "not too much wind", due to thermals being generated. So,after charging up batteries and prepping engines, it was taken to thesport range and readied to fly. Chris Taylor was tabbed for theSkyDart pilot. The engine combo for the SkyDart was changed to twoCHAD-staged C6's, and a flight profile where the SkyDart wouldair-start from level glide, not stage.
Nearly ready for flight, the SkyDart's R/C system would not comeon. The 3/32" jack used as an on-off switch failed to close after the"remove before flight" power plug was removed. So, back to the preparea to so some mods to bypass the switch, using the old fashionedbut workable "plug the battery in last" method.
Finally ready for flight, and a reasonably low wind for the day,the countdown began. At zero, the model started moving up and then"BANG", everything fell to the ground in several pieces. Butthere was also the noise of something thrusting up and away rapidly,end over end. It was one of the G12's, thrusting free from themodel.
The SkyDart was not damaged, beyond losing its forward attachmentdowel hook. The cato had made it separate completely from the SkyBooster, so there was no danger of the staged C6's igniting (not thatany of the wiring or batteries in the Sky Booster were any shape toignite anything either).
The Sky Booster though looked a mangled mess. The main wing hadthe 3" diameter body blown apart in the middle, starting at the R/Caccess hatch, with the front half of the tube completely knocked off.However the only significant damage to the wing was an area near theupper left, melted blue foam and some ripped/melted Econokotecovering. That area can be easily cut out and a new piece of bluefoam glued in, as that area of the wing is not structurally critical(If the wing had been damaged where the joiners are attached, thatmight have required replacing the whole wing). So, the model looks alot worse off than it is. The only part of the model itself that wasbadly damaged was the 3" tubing, which all needs to be replaced. Thevast amount of assembly time and effort went into the wing (includingservos), the nose cone's water ballast tank and plumbing, plus all ofthe pre-build work from the first sketches, to the 1/3 scaleboilerplate, to the custom-drawn and printed decals.
So, if I really had to do it in a short time (and had the 3"tubing on hand), the model could be repaired in about 3 nights. So,it will be fixed and flown at NARAM next year. Well, I need to getanother 32mm reload casing, I only have one good one left now.
There were some onboard casualties though. The 300 mAh NiMHbattery pack got hit by one of the two engine casings, tearing theshrink-wrap on it and leaving an impact mark. I'm already leery ofsmall NiMH packs now, so after a hit like that I won't trust thatpack for flying anymore. And the HS-50 servo used for pressing thelever switch for staging was MIA. We looked and looked for it, it wasgone, though the lever switch and Piezo beeper formerly attached toit were found. The Hitec 555 receiver LOOKS like it survived, but ithas not been tested out yet.
So now, what about the cato? It was actually my fault, I had hadsomething like this happen before (1996) but not so badly. I had notcleaned the front end of the engine casing out like I should havefrom previous flights. So, a bit of crud had built up, enough toallow a little bit of an air gap (not much, but any is not good).When the G12 ignited, the endburning propellant was forced by thepressurization to move up into the top of the casing like a piston ina cylinder. This made the slight bit of air get intensely hot (Dieseleffect), enough to ignite the forward end of the propellant grain.When the front end of the grain ignited, it instantly forced thepropellant DOWN, something had to give at that point (in 1996, themolded nozzle had fractured and forced the extinguished propellantout the aft closure like Play-Doh - the casing survived and theimpact to the model was not nearly as severe). What gave this timewas the back end of the engine casing, where the threads begin forthe aft closure to screw on. The casing broke right where the threadsstart, which is also a "safety" design of the engine so it willstructurally fail up and down and not outwards. That shot the aftclosure and propellant grain (which then self-extinguished) into theground, and made the engine casing ram up into the body tube at greatspeed. The engine mount was never built to take that kind of abuse,it was built for maybe 2X of max flight loads, not 100X plus catoloads. Judging by the streaks of white paint on the casing, it seemslike the casing ripped thru the body tube since the only paint on themodel was on the tube.
There are videos of all of the flights on Chris Taylor'sNARAMlive.com. Go to Wednesday's videos to see the two goodflights. And to Friday's videos for an incredibleat-the-pad-looking-up video of the cato.
| Have you seen me? | |
| | | |