Returnto Main Tips Page

1/2ABoost Glider Plans

For1/2A3-2T engine


Use THIS LINK for PLANS in PDF format  

Refer to the plans and the photos and comments on this web page.

Kits for this glider are available at upcoming club events and if need be directly from George.

This model goes together VERY fast if you use Cynacrylate (CA) type glue.

The glider hooks are cast resin, they are NOT plastic. CA works very well to glue them to wood. Contact cement is OK. Epoxy does not bond well to it, and white glue and plastic glues will not work at all on the hooks.

Also see the Boost Glider Tips Page

The parts for the glider. The main wing, canard, and rudders are made from 1/16" balsa. The main fuselage is 1/4" by 1/8" hard balsa. The cast glider hooks are available from George.

The glider will fly a little better if you round the leading and trailing edges. A little better still if they are airfoiled. But it will fly without any rounding at all.


Glue the main wing and canard to the fuselage, making sure they are not crooked.

Be sure to glue the canard to the angled portion of the front fuselage. 

The glider after adding the two rudders and glider part of the pod hook.

Another view

Parts for the Pop-pod. See the Plans.

Kevlar cord tied to mounting ring and screw eye on nose cone. Apply a little glue to the knot.

Complete Pod with glider after gluing in the shock cord mount ring and gluing on the pylon, lug, and Pod Hook.

Glider with Pod, in Boost mode.

A bit of clay (purple) has been added to the canard/fuselage joint for glide trim.

Use Masking Tape around part of the pod tube and the engine to hold the engine in, so it cannot kick out at ejection.

The raw balsa color can be hard to see on the ground. So, add color from a Permanent Magic Marker. Do not use "highlighter" markers, as they do not work well with balsa wood. Do not use paint as paint adds a lot of weight.

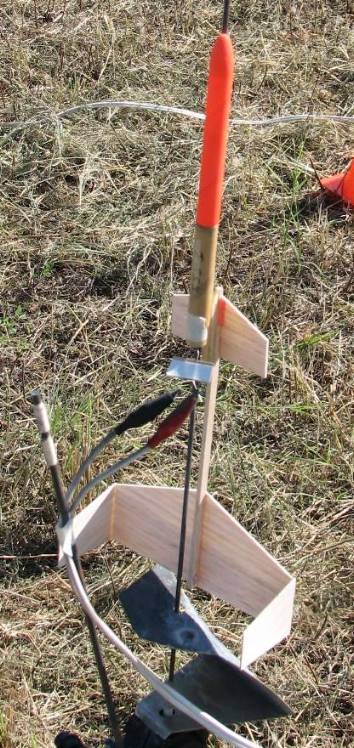
Use a small"flag" of masking tape on the rod to keep the pod from sliding down too far, or slip a soda straw over the rod to keep the pod raised up enough to allow for the glider to hang off of the pod without touching the blast deflector.

The micro-clips could snag the glider at liftoff and rip off a rudder or the wing.

So, use another rod as an "umbilical" to hold the ignition clips away from the glider, as in this photo.

Pay attention that wind does not make the glider rotate on the rod and accidentally put the wing or rudder in danger of hitting the clips at liftoff.

For Glide Trim, the Glider should balance in the ballpark of 1/2" to 5/8" in front of the Main wing. Put a mark on the fuselage as a reference point. Add a bit of clay to the nose (at the canard and fuselage joint) or the rear (at the Main wing and fuselage joint) to balance at the mark, then try test glides.

Test throw the glider. Assuming good throws: If it dives, add tailweight. If it stalls, add some noseweight. If it turns too much to the right, add a bit of clay to the left rudder/wing joint. If it turns too much to the left, add a bit of clay to the right rudder/wing joint. If you do add clay to a wingtip to fix a turn, you will probably also need to add a bit of clay to the nose to compensate.

Test flying on 1/2A power will help show you how well it is in trim. The ideal trim is a steady glide that is not too fast, is not in a stalling cycle, and has a WIDE gentle turn. Most gliders tend to turn left or right on their own.

I do not recommend flying it on an A engine. It may not be strong enough for an A, and so may shred. If it survives an A, it might glide so well that it flies off or drifts so far it is hard to find after landing.

For those who are curious about it, this is how the Cast Glider Hooks are made.

Complete pair at top. RTV rubber mold at bottom. Raw casting is in the middle before trimming, clean-up sanding, and gluing side plate to Pod Hook portion.

Alsosee the Boost Glider Tips Page

 Returnto Main Tips Page