|
|
|
|
Update 2008: The information below was written shortly after the successful boilerplates of Fall 1998 which paved the way for the Shuttl e model that was built in 1999, winning NARAM-41 and flown at the 2000 and 2002 WSMC's. |
|
 Video shot by Greg Warren, Mpeg conversion by Doug Pratt (Click here to go to a Movies page to download)
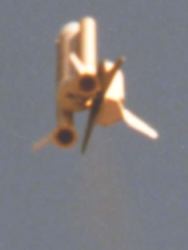
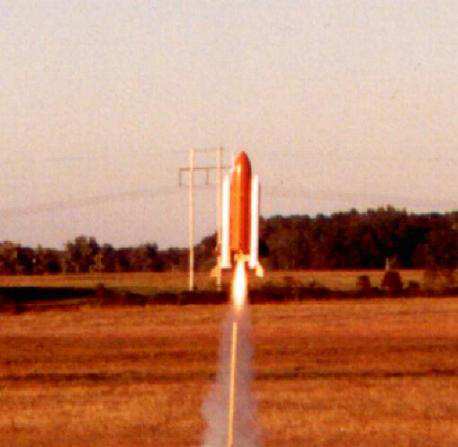
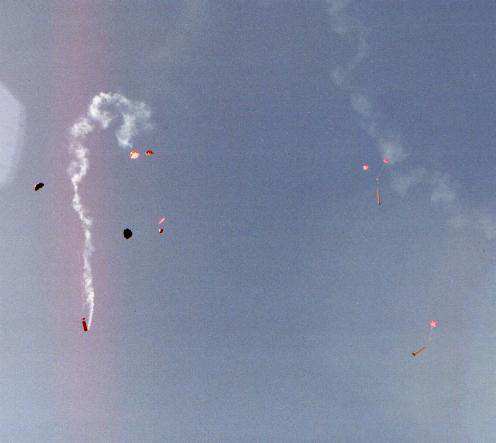
| Basic information on 1998 1/72 Boilerplate: This model was built from August to October 1998, as a boilerplate aiming for an FAI scale model for the World Championships in 2000, should I be chosen for the scale team. Its successful series of flights in October has opened the door to build a "serious" shuttle model for the first time, for Sport Scale at NARAM-41. The Orbiter is built mostly of balsa, with a vac-formed nose (the orbiter was built in 1984, upgraded for this boilerplate). 3 Channel R/C: Elevons for pitch control, movable rudder for directional control, and 3rd servo for Orbiter sep from ET (sep commanded by pilot). Glide mass 210 grams. Flies on an F25 expendable motor in the ET bottom, with an A3 motor in the Orbiter for "staging" (OMS burn simulation). Vac-formed ET Nose has a Flight Computer (by Jay Marsh) inside which senses Liftoff, Burnout, and Orbiter sep. At liftoff a flight program begins, when burnout is sensed the computer commands a servo in the ET to separate the SRB's. Computer waits for pilot to sep the Orbiter by R/C, then 1 second after Orbiter sep the computer fires the primary ejection charge. The Orbiter ignites an A3 motor for "staging" when it separates from the ET. SRB's have wind-up Timers in their noses which start timing when the SRB's are sepped from the ET. About 2 seconds after sep from ET the Timer releases a rubber band driven rod to push off the nose cone and deploy the recovery system. Each SRB has a single fin oriented 45 degrees below the Orbiter wing, partially aiding pitch stability but mostly proving ventral fin area to reduce yaw/roll coupling from the orbiter vertical tail (fin/rudder). Liftoff mass of the 1998 boilerplate is about 1000 grams, right a the FAI weight limit for S7 (scale). However, there is room for reducing mass such as using fiberglass tubes for the ET and SRB's, and Ben Roberto is studying the feasibility of composite construction of the orbiter. Such reduction in mass will have to be done to allow for the weight to be added by finishing, paint, and detailing that the boilerplate has not had. More information on the 1998 model is to be found below (scroll), as well as on the Details and Pictures pages. Shuttle Model History: As some of you know, I've made boilerplate and semi-scale models of the space shuttle for a long time. The first one was a crude 1/80 orbiter in August 1977, the day after the first Enterprise ALT flight. It made many nice piggyback flights before being retired due to wear and tear in the early 1980's. Next (1979) was a Full Stack (ET & SRB's) model at 1/110 scale, a sport flying model, that flew on a single D12. A photo of it is in Doug Pratt's "Basics of Model Rocketry" book. Its crude orbiter still exists, having made a lot of piggyback flights. The Rocket Boosted R/C orbiters began in fall 1982 with a 1/72 orbiter with slightly enlarged wings, based on a heavily modified plan by Luther Hux in Model Aviation magazine. It made approximately 30 flights on a special piggyback booster until 1989, mostly on D12-0/D12-3 staged flights, but a few on F15 power. On its final flight the piggyback booster's chute stripped causing the orbiter not to sep, so it plummeted and was damaged beyond practical repair. In spring 1984 another 1/72 orbiter was made with a scale sized wing, for a boilerplate of a full stack shuttle. It was made partly as a test model for what the US team hoped would be a fleet of shuttle models entered in scale at the 1984 or 1986 WSMC, but the idea lost steam. That full stack flew only 4 times with R/C, in 1984, before being shelved.
A couple of other shuttle boilerplates were built and tested after that, but none R/C or as big as 1/72 scale. One was about 1/100 scale using a North Pacific styrofoam Orbiter, and another was 1/87 with a balsa orbiter and BT-60 SRB's. Those test models showed that it was too risky to try to power the shuttle with engines in the SRB's instead of only using a single motor in the ET bottom for the main power, but also too risky to even use mini-A's in the SRB's for clustering points. The 1/87 boilerplate was the first to attempt SRB separation, using a servo and R/C to sep on command. It worked, however the orbiter came off of the ET every time the SRB's sepped so it was never possible to study whether the orbiter and ET coasted well after SRB sep or not. In 1992 a large orbiter, 1/60 scale was built, to fly on 32mm reloads (F13 or G12), using a non-scale special piggyback carrier. It replaced the old 1982 model as an R/C Sport flying orbiter. Some of you have seen that one such as at some NARAMs and a few Alabama launches. December 1994 and January 1995 a new 1/72 ET/SRB stack was built and the old 1984 scale winged orbiter modified, to fly as an FAI scale boilerplate model. The tubes came from the NCR shuttle kit, while the rest was made from scratch (such as vac-formed ET and SRB noses). It featured a number of improvements over the 1984 version, including SRB's to sep just after burnout (with an attachment method first proven out in the 1/87 boilerplate), with the SRB's deploying their own chutes. Unfortunately the model crashed twice, once due to a bad homemade receiver whip antenna (loss of signal and 180 degree turn at 70 up during boost) and the second time due to far too much elevon throw which allowed a "slight" pitch correction to put the model out of control. At least the orbiter was sepped by R/C both times so it didn't suffer crash damage that the ET/SRB's did. Plans to develop it any further for an FAI scale boilerplate were dropped partly due to the frustration over the crashes, partly due to some kludge solutions that would have to be totally reinvented, and also due to the fact the boilerplate weighed in at 850 grams at a time when the FAI limit was 750 grams. One notable improvement in launching shuttles was using a C-Rail launcher instead of a rod. Some of the earlier models had rolled at launch due to rod whip. The C-Rail reduces the tendency to roll. As well it has turned out that it is easier to prep the 1995-1998 shuttle models by putting the ET on the C-Rail launcher, attaching the SRB's, and attaching the Orbiter. Then carry the launcher to the pad area. After launch, bring the pad back to start prepping again. Yes, much like the Mobile Launch Platform for the real shuttle is taken from the VAB to the launch pad and after flight brought back to the VAB for another stacking. August 1998 Flights: I've had a renewed interest in building a shuttle now, and also the now FAI rules allow up to 1000 grams. Shortly before NARAM-40 the old 1995 boilerplate was repaired enough to be flight-worthy at NARAM, damaged tubes and all. No SRB internal chute deployment system, damaged beyond use in the first 1995 crash, the SRB chutes simply attached externally and packed tightly to fit into the space between the ET and SRB tube.
The NARAM test flights of the old 1995 boilerplate were enough to show that it was worth building a new ET/SRB boilerplate set, to improve on a number of problems that the old one had discovered. Matt Steele donated a number of 4.6" and 2" tubes from the old NCR 1/72 shuttle kit to this project, and Mike Dorffler donated a few BT-80's used for the Computer/Recovery housing module. Special thanks as well to George Rachor who videotaped the first two flights which were very useful in reviewing the flights. SRB's: The rubber band external strap method for forward SRB sep was replaced by an internal latch system. Actually this system had been designed for the 1995 boilerplate but at the last minute it was found not to work due to a problem with how the SRB recovery system was supposed to work, so the external rubber band straps were a kludge fix (a return to the method used by the 1/87 boilerplate). The SRB's got the recovery system fix they really needed, since in the 1995 boilerplate they were to deploy right at SRB sep and that not only had caused the internal latches to bind but could have caused a snag at SRB sep. The new SRB's got their own timers to deploy the chutes about 2 seconds after sep. Electronics and pyrotechnics would involve excess mass and problems of arming safely. So instead the original concept of a rubber-band driven dowel to push off the SRB nose was revived, but with a wind-up timer and latch to keep the dowel from pushing off the nose. The wind-up timers come from small cheap "Tomy type" toys, in this case $1 crawling bugs. A 180 degree disk is attached to the wind-up shaft so that the disc engages a lever arm that holds the dowel down. When the disc rotates 180 degrees, the lever is freed and lets the rubber band drive the dowel forward. A perpendicular rod that presses into the disc, the other end pressing into the ET, is what keeps the Timer running until the SRB has sepped and the rod slides outwards. (For more on the SRB's see the Details and Pictures pages) Another major upgrade was in the electronics. The 1995 version used a simple servo driver circuit with two possible servo positions for the SRB's, one to hold them on and one for Sep. Sensors for that were a mercury switch (preventing accidental triggering on the ground) and a special "thrust switch" (engine slides freely so presses on the switch under thrust, with a spring strong enough to push the engine back as it nears burnout). There also was a simple timer (old NCR "Veet-1" timer) for the ejection charge, timed to fire 1 second after the orbiter sepped (a switch in the ET pressing on the orbiter). The 1998 version has a Flight Computer designed and programmed by Jay Marsh, which he developed for the FAI Saturn IB models that he and Tom Campbell flew at the 1998 WSMC in Romania. The F.C. makes use of two "Basic Stamp" microcontrollers, made by Parallax, working together for different portions of the programming. The shuttle F.C. was a slightly modified version of one of Jay's Saturn IB F.C.'s. , but with a lot of different programming. It has a capability to check continuity for the primary ejection charge, and to fire a back-up ejection charge. It has 3 inputs that it gets from the main ET: a Liftoff sensor, Orbiter Sep sensor, and Thrust sensor (No more need for merc switch safeguard due to the Liftoff sensor). The programming handles how normal flights should go, as well as a limited range of contingencies when something is not working correctly such as no burnout detected 1 second after the selected motor should have burned out, in case the engine getting jammed in the mount and not sliding back (that is, if SRB sep is overdue, the F.C. will ignore the Thrust sensor and sep them). On a regular flight the SRB's sep when burnout is sensed, and the ET does not eject until the orbiter has sepped (though there is a long window by which either the orbiter has been sepped by R/C or the computer will assume the orbiter sep has failed or not sensed properly and it will eject anyway). The F.C. beeps out a single digit number to indicate preflight and postflight status. A beep of 1 is good, all OK. If something is not good then it beeps the number for each error found, such as orbiter sep detected which is a very bad thing to be detecting before liftoff (and which did occur before a flight). Fortunately the programming does not try to sep the SRB's or fire the ejection charge(s) until liftoff has been detected, safeguards that the original crude electronics did not have. And in any case it cannot fire the ejection charge until it is fully armed. The model is armed using the same method as Jay Marsh developed for his IB models, and as many do for HPR models which use electronics. 3/32" jacks are used for "Remove Before Flight" type plugs. One is used for power to turn the computer on. The other is for actual arming of the ejection charge. Before launch first the computer is turned on by removing the power plug and listening for the OK error beeps. When OK is heard and just before countdown, the ejection arm plug is removed. The orbiter has a similar power and arming jack/plug arrangement as well. The "arm" is for ignition of an A3 motor in the orbiter, to score 30 points for "staging" under FAI rules (simulating an OMS burn). When the orbiter seps from the ET, a switch closes that ignites the A3. If the A3 does not ignite the orbiter can be too tail-heavy to glide, coming down vertically but fuselage level (literally a belly-flop). October 1998 Flights: This 1998 boilerplate was test flown 8 times in October. First three flights were at a US Team get-together and practice in Muncie, Indiana the first weekend in October. There was some apprehension not only about flying, but the Flight Computer too since the first time the fully programmed F.C. was installed in the boilerplate was Friday night in Muncie, when Jay Marsh arrived. Jay provided the F.C. 2 weeks before for some interface, wiring, and installation work, with some crude programming to give feedback on sensor switch positions. Only had it for a few days then needed to send it back for final programming (He did a lot of programming in parallel at the same time, using one of his Saturn IB prototype F.C.'s). Fortunately everything worked out in static testing, including the F.C.'s response to simulated out-of-normal flight conditions. Saturday's flying was rained out, there was just enough time to get in 3 flights on Sunday. All worked for the most part, with some problems with weathercocking and the orbiter being tail-heavy the first two times, not gliding but falling flat. First time it did that due to the A3 not igniting (didn't plug in the leads correctly), second time (with a fired A3 in place) the CG was just totally missed. Third time all worked well, including the orbiter gliding down. The flights were significant in proving the new improvements worked,except for screwing up the A3 staging. The Flight Computer worked fine, SRB wind-up timer/deployment systems worked fine, and the ET ejection system worked fine. I had wondered mid-way thru the development of the wind-up timers if they were going to work out well after all, but they did prove out to work well and still keep on working. The flying in Muncie was also notable by the style that occurs when flying on a team like that. There was some significant landing damage to the orbiter from those flat landings onto a gravel parking lot, Ben Roberto took over to do the repairs and have the orbiter ready when the ET and SRB's were prepped and ready for flight. Others also pitched in with the prepping. And after flight they helped recover the six separate parts of the model. And thanks to Bob Biedron for videotaping the flights.
Greg Warren videotaped these flights,as with George Rachor's and Bob Biedron's tapes these have all proven valuable in analyzing just what happened since there's a lot of things going on and too many parts to keep track of at the same time.
With these successes the plan to develop this more to apply for a position on the US scale team next year. The next World Championships (WSMC) is in the year 2000. As a shorter term goal our NAR, Southern Neutron, will probably be entering a shuttle model at NARAM-41. Jay Marsh will be helping to provide fiberglass tubes for improving the model, the boilerplate now has grown close to the 1000 gram FAI limit without any paint or details, so some of the weight will be swapped out by those lighter tubes. Longer range Ben Roberto is studying the prospects for making the orbiter using composite materials, a necessity for the FAI version make to it light enough. Along the way more research will be done in collecting scale data on the shuttle, selecting a mission to model, and pictures supporting either that mission or generic details. For more information check the Details and Photographs pages. Shuttle Model FAQ: What does "boilerplate" mean? A crude version of something, the word originates from a time when full size models or mock-ups were built from boilerplate steel. The Space program has had boilerplates, such as Mercury and Apollo capsules. As regards building scale flying rocket models, a boilerplate is a crude model meant to test some or all aspects of how a later "real" scale model will fly. If there is an inherent flaw in the design, better to find it out using a boilerplate model with a lot less invested in it than an actual scale model if something goes wrong. Why not fly it with engines in the SRB's? Reliability. The SRB's are so far apart that any imbalance in thrust or out of sync ignition of the motors will introduce a yaw that would put the model out of control. It's too high of a risk for a model with so much time being put into it, and given the results of the tests through the years. Therefore it is powered by a single engine in the base of the ET. What about small motors in the SRB's for cluster points? Tried it a few times with a 1/87 boilerplate. First time the F in the ET was late to ignite, the A3's lit took it up the rod, slid down the rod, damaged an SRB attachment and then when the F did come to thrust all hell broke loose 30 feet up as the damaged SRB came off. Later a special device was built for the pad so that the flashbulbs to the SRB mini-A's would not ignite until the model raised up 1/2" up the rod, for launch, avoiding the problem with late ignition of the F motor. About half the time one of the SRB's did not ignite...and once neither ignited, which was really bad since the only way those SRB's got any chutes out was by the ejection charges of those motors. So, OK, it's still possible to add some small motors to the SRB's just for cluster points but the risks seem to outweigh the benefits. Is this model from the old North Coast kit? Distantly. It does use 4.6" and 2" tubing from the old NCR kit.... thanks to tubes donated by Matt Steele. The kit's balsa ET nose has been used as a master for vac-forming hollow cones, using .080 plastic sheet. And the kit's aft dome was used for casting a solid master to then use for vac-forming new aft domes. By the time an FAI model is built none of those parts or vac-form masters will be used. Why a wind-up timer in the SRB's instead of electronic/pyrotechnic charges? Electronic systems for the SRB's would add additional weight, the mass of the timer and whatever mass of the batteries needed to fire a flashbulb. And such mass is doubled since there are two SRB's. There is also a problem in trying to devise a means of arming/safing the electronics to avoid accidental firing. What about deploying landing gear? Not worth the added complexity, fragility, and extra mass. Not to mention the unlikelihood of anyplace suitable to land on with such tiny wheels. Radio Control Notes: The Orbiter uses elevons for pitch only, not mixed elevons with aileron control. I found the original R/C orbiter from 1982 to be far too sensitive to fly with mixed elevons. On its first flight I tried to turn it and it did a 360 roll before I could react. Reduced the aileron control down to 1/32" up and 1/32" down, but still found it hard to fly since I never have had much experience flying ailerons. One day it finally happened, "lost it" in glide and it spiraled in. In rebuilding it I gave it a moveable rudder instead, and that made all the difference in the world. Very smooth control, a lot easier to fly. Ever R/C orbiter since has flown that way with movable rudder instead of mixed elevons. But there are two things about using rudder on the Orbiter. One is that if the full height rudder moves, it can act like a vertical aileron in glide, at low angles of attack, causing control reversal. Once built a big cardboard orbiter to throw off a 30 foot cliff, and found out the hard way...in a shallow dive it rolled right when I gave left rudder. On another throw with a higher angle of attack the left rudder created left yaw and a bank to the left. The key is to make only the lower part of the rudder move. As can be seen in pics of the 1/72 orbiter, the movable part corresponds with the split portion of the rudder on the real shuttle. That is plenty adequate area for directional control in glide, and even roll control during boost. And that is the second thing about using rudder control on the orbiter, boost. During boost it does act like a vertical aileron, so left rudder causes right roll. The fix to that is to set up the transmitter so that when in Boost Mode the rudder has opposite throw to get the desired result (left stick commands right rudder, producing left roll), then when flipping a switch from Boost to Glide mode the throw is normal. The model is controlled by a Futaba 8UAF transmitter. Much thanks to Futaba for supporting the 1998 US S8E Team, and to Don Edberg for the tip on how to program the inflight rudder reversal trick for boost. I am using Switch D for the Boost Mode/Glide Mode switch. It not only handles rudder reversal but also dual rates for rudder and elevator, Glide trim (channel 7 knob mixed into elevator), and to automatically command the Orbiter Sep servo to the Sep position to release a latch. Both the 1/72 Orbiter and 1/60 Sport orbiter use Hitec/RCD 555 Receivers with Deans whip antennas (Also have used Cannon Super Micro Rx's). Servos are HS-60's for the flight controls and old Cannon Super micro servo for Orbiter Sep. Electrical power by 50 mAh 4.8 nicad packs, as are also used for S8E (E powered R/C Rocket Glider) models. |


|
|
|