|
|
| In May 1979, I built my first purpose-made shuttle stack, for sport flying. It was at 1/110 scale, using BT-55 SRB's, and an ET of 3 or 3.25" diameter (scale would have been about 3"). Built to fly on a single D12, with clear fins mounted to two Centuri ST-10 clear tubes. The orbiter was built much like my first orbiter (1/80 scale). Very crude, no details. But very lightweight, so it could glide nicely. Built using 1/32" balsa for the fuselage tops and sides, 1/16" balsa for the bottom & wings. Its most notable flight was at NARAM-21 at JSC in Houston (photo at right by Alan Williams) The old ET/SRB set is long gone, but thru the years the 1/110 orbiter flew piggyback a lot, as a nice little sport glider. Tom Beach made up plans for it in an issue of Sport Rocketry magazine. Same basic construction, but much nicer looking. Below are photos of the old 1979 orbiter, that orbiter on my old piggyback booster (BT-60 and BT-55), and Tom Beach's piggyback 1/110 orbiter. | 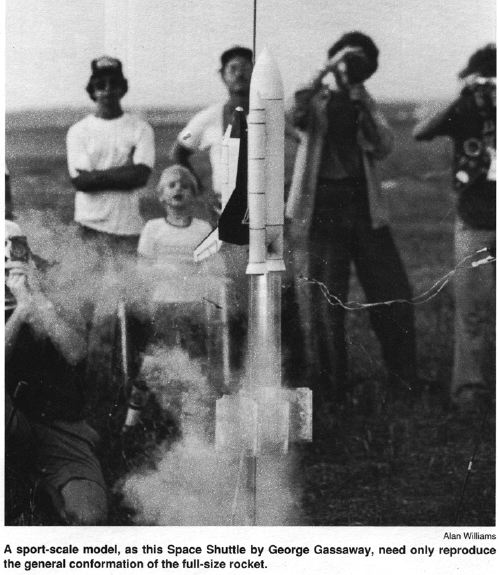 |
 |  |  |  |  |
| After a long thread on The Rocketry Forum, in which I mentioned many of my previous shuttles, I got to thinking about making a new model at 1/110 scale. This time, using the Guillow's foam orbiter, which is about the right size for 1/110 scale (fuselage length at about 1/116 scale, enlarged wings at about 1/94 scale). First as a Boilerplate. For the ET, a piece of 3" Mailing tube. For the SRB's, BT-55 again. For the SRB noses, vac-forms from a mold meant for BT-60 SRB noses (trimmed in length to match BT-55). The ET nose was tricky. I had a wood mold Jay Marsh made, for a 1/87 shuttle boilerplate, at about 3.75" diameter. I modified a vac-formed nose made from that mold, and cut out a pie-wedge segment to allow the formed nose to be compressed for a smaller diameter, to work with the 3" mailing tube. The cut out portion was glued inside as a joiner. The SRB Aft skirts were vac-formed from the same big cone I use for forming 1/72 shuttle aft skirts, just trimmed differently to work for 1/110 scale. Fins will be mounted behind the SRB's, somewhat like the old Estes shuttle fins. | 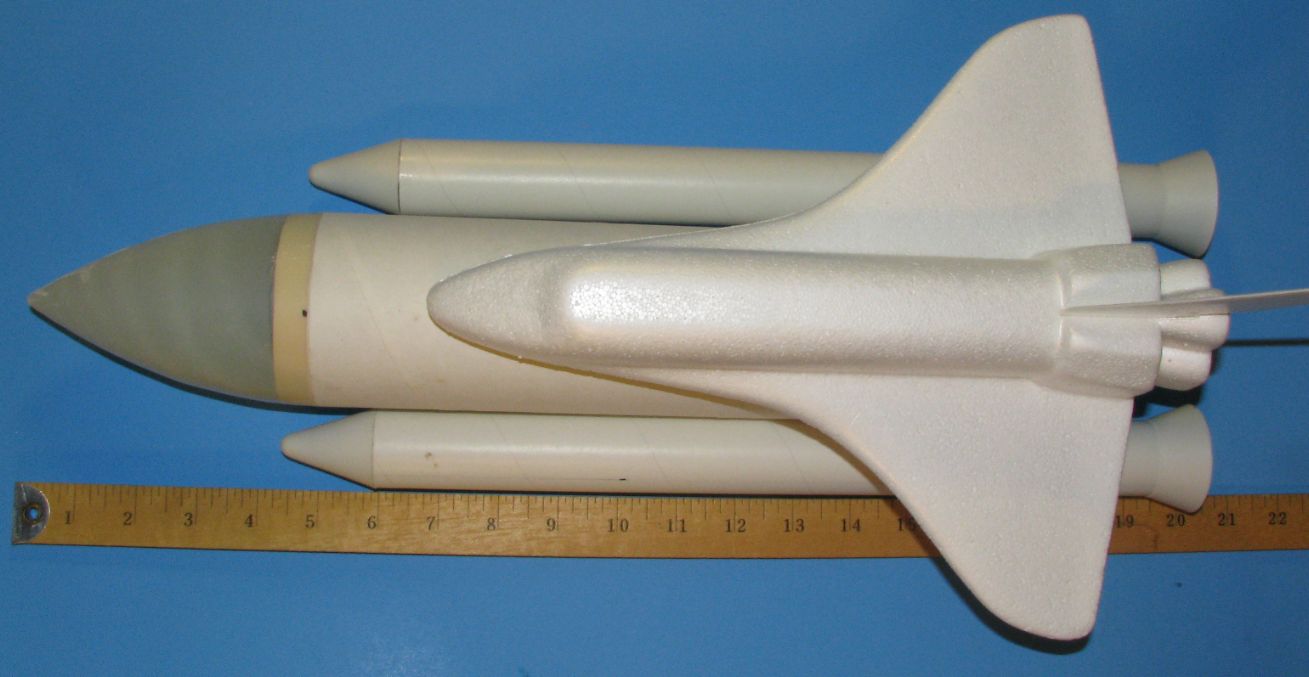 |
 |  |  |
| | | |
 |  |  |
| | | |
| |  |  |
| | | meant for creating RTV casting molds. The test went well. |
![]()
| Got the boilerplate ready to fly, but the weather was "iffy". Overcast, light fog in some places, misting at times. But it was not too windy, about 5 to 8 mph, and the temperatures were in the mid-60's. Likely the best weather for the week, until the next scheduled club launch on the 19th. I was joined by Steward Jones, who shot video. To me, a big reason for the video would be to troubleshoot the model if it pitched into a bad flight path. But there would be no need for post-flight analysis to fix problems. It boosted REALLY well, a slight weathercocking into the wind as would be expected. A decent altitude on the D12-3, I figure at least 300 feet, Steward thought more. The orbiter separated and glided down, while the main stack came down by Chute. It flew well again, on another D12-3 flight. And again, on an E9-4 flight which also flew pretty straight, and pretty high. It will get a few tweaks, mostly some basic paint, for the BRB launch. Hopefully some better skies for photography and video. Steward Jones put a high-quality video of all the flights on YouTube. Click here to see it. |    |
 |  |  |
| | | |
 |  |  |
| | | |
| |  | |
| | | |
 | |  |
| | | |
![]()
| At the BRB December launch,the 1/110 boilerplate was flown three more times. It was windy, at 10 mph or more. The model flew well. It weathercocked into the wind, but no more than a very stable model of a similar mass. All three flights were very good. Due to the wind, I did not try an E9 flight as the orbiter might have drifted into the woods. On the last D12-3 flight, the orbiter hit a little bit of lift and actually came within 200 feet of a fenced-off area, beyond which were woods. So, good thing that was not an E9 flight. The model was not patined as I had hoped to do. But I did make one modification from the first three flights. A baffle ring was added inside the ET tube so that the ejection charge did not have a straight shot directly thru the short 3" tube. I had noticed some jesting smoke residue on parts of the front end of the ET tube and SRB noses after the first three flights, and saw in one of Steward's videos that a fireball from ejection shot out the front of the model. This baffle worked great, it did not even blow the wadding out of the ET tube. The baffle is NOT meant to replace wadding, the model still needs wadding. All the "baffle" really is, is a third centering ring. This time with the offset hole away from the engine mount front end, forcing the ejection gases to zig-zag instead of having a straight shot. |    |
 |  |  |
| | ||
| | |  |
| | ||
 |  | |
| | ||
| On Dec 21st, I announced on TRF that this has actually been aimed at producing a KIT: "OK, here is what this 1/110 shuttle boilerplate has been about. And I am a little bit surprised nobody figured it out. A proof-of-concept prototype for a kit that I plan to produce in the next 2 months or so. I wanted to be sure it flew well before saying anything, or starting to arrange for obtaining raw parts (like tubes) and molds for vac-forming many parts and RTV and casting resin for casting a few other parts. The kit will use vac-formed parts for the ET nose and aft dome. Vac-formed parts for the SRB noses, aft skirts and SRB nozzles. There MAY be a vac-formed wrap for the intertank, depending on whether I can get the master pattern for that laser-cut (I did a test vac-forming with a similar intertank type of pattern and it worked out well). Orbiter will be the same, the Guillow's foam orbiter. The idea for this model is to be easy to assemble, and for it to fly well. It is not going to have lots of scale details. The idea will be to focus more on flying it than looking at it on a shelf. The cast parts will not be aimed at being scale detail parts. Instead, they will be aimed at making the model easier to assemble. Such as aligning and gluing the SRB's to the ET. I have the intention for the ET tube and SRB tubes to be pre-drilled with holes, probably 1/16". The cast attachment parts will have very short alignment pins (1/16") that will fit into those pre-drilled holes. So, it will be like gluing together a plastic model that has alignment pins that fit into holes. For the ET to Orbiter attachments, same sort of thing. The ones on the ET will be cast and make use of alignment pins to fit into holes in the ET tube. There will be very little (possibly zero) use of any paper marking guides for assembly. Reference lines will be pre-marked onto the tubes. I will be making up jigs to assist me with drilling all the various holes at the right places and marking the lines. I *think* I will be able to work up a marking guide for the gray leading edges of the orbiter, for those who would want to have it look more accurate, so they'd have pre-drawn reference lines on the foam orbiter to assist with where to paint it gray. There will be custom decals. I already have some that I drew up for my 1/72 shuttle, which can be resized (And tweaked since the Guillow's orbiter cockpit window area is shaped a little differently). Some other aspects of the decals will have to be made up new, since I used some other brand of decals on my 1/72 contest shuttle in addition to my custom ones. Assuming I do this, it will be done in three phases. One, I'll be working up the prototype kits at home, and send a couple of them to some people I know for some feedback. That will be the most time-consuming portion since this means making up the master parts for the cast pieces, the jigs, marking jigs, decals, instructions, and even building and flying a boilerplate 2.0 to check out how it does with all the "real" parts (for example the 1.0 prototype uses a mailing tube 3.12" in diameter, not 3.0", and no intertank wrap other than a printed one). And all of that has to happen before I send out a couple of pre-production prototypes for feedback. Two, I'll produce a limited production run of about 10 kits for sale. The money from those first 10 kits will help to recoup the cost of the molds , supplies, and provide some seed money for the next step. I already have two local BRB club members who are pretty much insisting they get to buy kit #1 and kit #2 (both wanted #1), so I do not have too much concern about selling the other 8. Three, well, if the first 10 sell well, I will buy a lot more supplies and go into unlimited production of the kit. Also I'd like to get feedback from everyone who buys those first 10 kits, so if there was a need to tweak the kit, or instructions, or whatever, I can do that before churning out a lot more kits. Oh, and four, I may also get into selling a few other things, rather than just sell the shuttle as my only product. Will have to see how it goes." - George Gassaway |
|