| | NARAM-46 | |
| |
| |
| |
| | | | |
| |
In addition to the article below, check out the Plastic Model Conversion article written by Jeff Vincent, in the July/August 1999 issue of ASTRE's "Stardust" newsletter (downloadable PDF issue, 3.6 megs).
Stability: Just about every plastic model needs some help to be stable. The easy way is to add noseweight (such as clay, or small lead fishing weights embedded in clay), which is fine for some models. For other models, the engine may not be able to lift any additional weight, or there may not be room to add noseweight, or the fins may be too small, or non-existent, so the fin area must be increased. You can get sheet plastic at most hobby shops, 0.04" styrene is a typical thickness to use. Models such as the Saturn-V can benefit from having the fins made somewhat larger, the old Estes kit used fins that were larger than scale. Since the contest event is "plastic conversion", and not "plastic scale conversion," you do have the leeway to make fins oversized even if it's out of scale. The "cardboard cutout" method can be useful in determining the Center of Pressure (CP), indicating whether the fins are large enough or if noseweight may be needed after all. Some models that have no fins can use clear plastic fins, or you could choose to use normal opaque painted plastic. Clear fins are notoriously difficult to glue on neatly and mask off for painting. But if you choose to use clear fins, you can get the 0.04" clear plastic made by Plastruct. That clear plastic is a bit flexible, this is not a problem for small fins but can be for large fins. If flexing is a problem, try to find cheap clear plastic boxes to cannibalize for stiff clear fin material. However, one of the most ideal clear fin materials is Lexan (aka Polycarbonate). You can find 1/32" and 1/16" thicknesses of it sold by Micro-Mark. Do not use Cyanoacrylate to attach clear fins, not only does it not work well, but it often frosts up the plastic. Use a liquid plastic cement for bonding clear fins to the plastic kit. If you have the skill to do it neatly, and if the model is suitable, you can use the slot and tab method with the clear fins. Cut the fins with a tab in the root meant to fit into a slot in he plastic model. And use great care in cutting out slots that are just exactly the width of the fin thickness, or maybe a hair undersize then file slightly wider as needed. Be careful about the use of liquid cement to glue the fin in place. Mask off the fins very carefully so that paint won't creep onto the clear fin. Also keep in mind that a model has to be stable in both pitch and yaw. If one were to convert a Klingon Battle Cruiser (something best left to experts) it might be stable in pitch but not in yaw, so rudder-like fins may be needed. Some models with wings can be technically "stable" but pitch up (or down) due to a different incidence angle between the wings and tail surfaces. Check that the angle of attack of the wing and the horizontal tail surface (stabilizer) are the same. If the tail is at a different angle, the model is likely to loop into the ground due to the aerodynamic lift generated (the 1/32 Revell X-1 has this problem). It will be necessary to attach the tail surfaces at a different angle of attack so that they are parallel with the wing angle of attack. If you still have doubts about whether the model may pitch due to thrust or aerodynamics, you can make the model roll to help even out the pitch, in a "barrel roll" boost. This can be done by adding spin tabs to fins, or cutting & gluing ailerons to make the model roll. 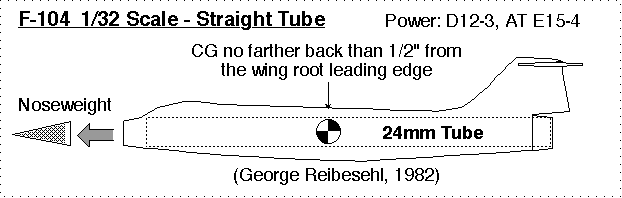 click drawing to see at twice size [ QCR has special kits for the F-104 and F-100 jets, which come with everything needed for conversion (parts) as well as instructions. ] Ejection: When the ejection charge fires, where it is going and where will the chutes be pushed out? In a simple conversion this is no problem, the engine mount tube can run all the way through the model, or it can be glued with centering rings into a larger tube for the parachute compartment. But, if the recovery system is going to come out at a different angle than the engine thrustline, the ejection charge needs to be ducted in some way. For a model like the F-16, it is possible to do a "bent tube" ejection by having the front of the engine mount tube join the rear of the recovery system's tube with one centering ring, glued at an angle instead of straight. For others, it could be more complex, using a tube that is ducted or even a series of tubes that do a zig-zag or a 180 degree turnaround to eject out of the rear. No matter where the ejection charge is routed, the ejection heat does tend to damage the first 2-3 inches of tube ahead of the engine (with composite motors there is some significant smoldering flame after ejection). The exposed areas can be protected by adding in a tube coupler or a layer of epoxy, or using thin CA soaked into the paper. Some models may be suited for rear-ejection. An ejecting engine mount tube with centering rings glued to it, freely slides out of a larger tube plugged at the forward end. The recovery system is stored in the space between the outside of the engine tube and the inside of the larger tube. The ejection speed is high, sometimes shock cords snap trying to stop the ejecting mount tube. It is recommended to use separate chutes and shock cords, so that problem can be avoided (see the shuttle orbiter conversion). Some models have no obvious or easy location for the separation joint which allows the parachute to eject, you may need to make your own nose section separation point. Wrap masking tape around the body as a guide and use a razor saw to carefully cut the body apart. This can be particularly useful for some jets (see the F-105), allowing complete cockpit detail to be used. 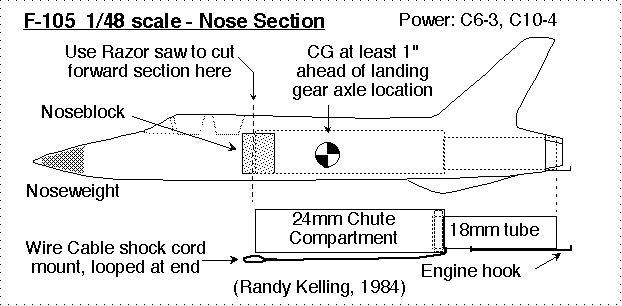 click drawing to see at twice size Recovery system: It is important to have a good strong reliable shock cord and parachute system for the model. Plastic models are heavy and tend to stress the recovery system a lot at deployment. To keep the parachute compartment tube clear, try to mount the shock cord to the outside of the tube, but still inside the plastic model. One approach is to use flexible wire cable, secured deep in the model, with a looped end coming out at the front to tie the real shock cord to (see the F-105). Or, secure 50-100 pound test Kevlar line inside the tube, extending it out a few inches to allow shock cord attachment (Kevlar line is heat-resistant, but beware that for example D12 type ejection charges will burn thru 100 pound Kevlar). When the shock cord is mounted outside of the tube like this, it is necessary to cut a slot into the shoulder of any nose block that may be used, so that when packed the shock cord will not jam between the inside of the tube and shoulder. Not surprisingly, the shock cord should be able to absorb shock. Elastic is good for this. For models of 4-6 ounces, 1/8" elastic is adequate, for heavier models 3/16-1/4" elastic is better. The more length, the better the elastic can absorb the shock when the chute deploys, but do not use so much that the recovery compartment tube is crammed. Parachutes need to be able to be stored small, deploy well, and hold up without ripping or losing shroud lines. Cloth chutes are great for strength, but take far too much room. Mylar chutes can be packed very small and tight, but they can rip easily and sometimes do not deploy reliably. Most commercial plastic chutes are suitable, but need to be reinforced. For a 6-line chute, replace the 6 lines with 3 very long lines, and run them across the top of the chute. Use extra tabs to secure the lines across the top near the center. This ensures that no lines will pull out.  click drawing to see at twice size Chute size is a judgment call. The larger the chute, the softer the landing...unless it's so big that it gets jammed inside and the model crashes! Smaller chutes cause harder landings, but are more reliable. Experiment with packing chutes in the tube you're using, if you are not able to blow the chute out using lung power, go to a smaller chute or try a different way to pack the chute. And remember this when it comes time to fly, to pack the chute in the manner it requires. Consider using more than one chute, it may be easier to fit in 2 smaller chutes than one larger one, and if only one opens the model won't crash. Given the above considerations, you've chosen a model and are ready to put those ideas and your plans into action by building, but will the conversion really work? Would you like to know for sure it will work before building a detailed pretty model? It's highly recommended to build a "boilerplate" model first and find out. This means you simply do just the flight conversion work to build a model, don't paint it or worry about filling seams and so forth. Then fly it, and see if it works. If it crashes, you saved a lot of time and effort, and might be able to determine how to solve the problem if you want to try again. If it works, great, now you have the confidence to invest that time and effort. Building Tips: Plan out what order of assembly is needed, you don't want to glue two body halves together and then realize that you need to do something inside, like mounting a shock cord. The engine mount tubes and other internal body tubes need to be secured into the model. For a cylindrical plastic model, custom centering rings can be made up, or if the fit is close simply wraps of masking tape, then glue the tubes to the model using the rings or gluing to the tape. For other types, spacer blocks from balsa or spruce are needed to hold the tubes in the proper position. Plastic cement does not work well with wood or paper, so use cyanoacrylate to bond the spacer blocks (careful not to let any run to the outside of the model). Remove as much excess material inside as practical to save weight, especially near the tail. Tools: A razor saw is very useful for cutting separation joints for models. A Dremel moto-tool can be used with a cutting disc to remove large areas, where the disc can fit into. As well, a grinding bit can be used on the moto-tool for removing material more carefully and in smaller spaces, and to remove internal obstructions such as bulkheads and landing gear bays to allow a tube to pass through. A small number of file shapes can also be handy for shaping, rounding out smaller holes, or "deburring". For some detail work, small drill bits turned by hand can be useful, a pin vise can be used, or you can simply glue small drill bits into 3" long 1/4" dowels, rounded at the top end for low friction when pressing down. Finishing: This article is mainly about how to flight convert models, whole magazines are devoted on how to actually build and finish plastic models. Some keys to a good finish include neat glue joints, and the use of wet or dry type sandpaper of increasingly finer grits to wet-sand the seams and putty (Flex-I-grit sandpaper by K&S is best). Plastic putty can be used not only for filling seams, but to blend and smooth trouble spots, particularly around engine mount tubes if the body had to be cut to make it fit. Use paints intended for plastic models, do not use dope! Spray cans are typically used. An airbrush is nice but overkill for many basic model's needs. If you want a flat finish but will be using decals, use gloss paint(s) first, apply the decals, then apply a flat clear coat. Otherwise, decals applied over flat paint look "silvery" in the clear areas of the decal. Anytime different paint types are used, do a test first on some scrap plastic or other material. Some paints are not compatible with other paints. Some clear coats are not compatible and can even attack decals and/or dry-transfers. If you plan to mask off colors, paint the lighter color first. Let the paint dry and harden for a coupe of days, then mask. Carefully applied scotch "magic" tape can work well for some masking jobs. After applying the 2nd color, remove the tape mask about 30 minutes later, before the new paint gets "hard", so the tape will come off without bringing chipped flakes of the dried 2nd layer of paint with it. Decals are best applied using a decal setting solution, this not only can make the decal conform well over any surface detail, but allows the decal to "slide" easily into place (push the decal into place with a small model paint brush).
The above article includes several conversion examples which are known to work. Pay particular heed to the listed distance from the nose for the lengthwise CG locations. The CG can be forward of the location shown, but not further towards the rear. If you build a model of a different scale, be sure to convert the CG location accurately. |


| Model Kits & Article | Designer | Notes |
| Ken Brown of Qualified Competition Rockets | "All kits include the plastic model, tubes, shock cords, weights for nose, launch lugs, parachute kit, instructions, and plastic model conversion literature." | |
| Plastic Model Conversion article from ASTRE's "Stardust" newsletter, July/August 1999 | Jeff Vincent, article author | Downloadable PDF issue, 3.6 megs. |