 | NARAM-50 Event Tips Pages (draft) | |
D Boost GlideBoost Glide combines the challenge of building and flying aglider which can boost relatively well (and hold together) on rocketpower, and transition to a long gliding flight.
Boost Gliders often use a pop-pod, or sometimes are attached tothe side of a larger rocket (parasite) for the vertical boost portionof the flight, then separate for the glide back to earth. If theentry kicks out an engine, the engine needs to have a streamer on it.A free-falling engine casing will be DQ'ed. The glider portion istimed. The glider must be returned for one of the two flightsallowed.
Flex-wing (Rogallo/hang glider) type gliders are not allowed.
For the full rules for this event, please see the BoostGlide Rules on the NAR web page.
Scoring - For Boost Glide, the scoring is the sum of thetimes from the two flights allowed, with at least one of thoseflights having the glider returned.
Design considerations - Trade-offs of high gliderperformance, visibility, surviving rocket boost, and shooting for areasonable boost altitude.
It's not very practical to modify the proverbial 49 cent balsaglider to fly this event since the wings probably would rip off. Bestto go with a kit, or with a plan. With experience, you might laterdevelop a knack for designing your own gliders, but it's best tolearn from a proven design first.
For D power, it is more difficult than usual. A classic D12boosted glider has a lot of stress on the wings. Some models shredthe wings because they are just too weak to hold up to the velocityof a D12 boost. Also, it can be harder to get a model to booststraight on a D12 than with lower power.
A list of plans and kits is included furtherdown on this page.
Unfortunately, there is not a lot in the way of plans for D PowerBoost Glide. It is flown so rarely that not many plans have been madeup of the successful models. Also, some of the more experiencedglider fliers are using Radio Controlled (R/C) models.
There is one good proven plan. Trip Barber's D-LightBoost Glider. It took 2nd, 3rd, and 4th at the last NARAM to holdD B/G, in 1997. If you are up to building a good glider from a plan,this is a really good one to use.
UPDATE June 29th, 2008 -Sweepette 19 HLG Conversionpage, and HandLaunch Glider website.
The HLG sitehas links with info on how to build HLG's, Detecting THermals, andDethermalizers.
Of the kits available, the QCR"Neverloop IV" may be the most competitive. Some might want totry the Edmonds"Arcie-II". It could even be simply built as a free-flight model,with the ailerons locked into neutral. But it would be more fun totry it with the R/C gear.
Other strategies involve the use of gliders designed C power. Oneway to do it would be to cluster a C6 and 1/2A3 engine, to nudge themodel over 10 N-sec( a 1/4A would not be enough). That is a littlebit risky, and if the 1/2A does not ignite the flight will not bequalified.
Another way would be to stage a C powered glider with a C6-0 toanother engine, ultimately another C6. Possible problems there arethat the pod might strip at staging, and that the model might notboost straight. Worst-case it could even shred the wing.
A final strategy is to "piggyback". Use a relatively large normalD powered rocket and just add a glider to the side of it. The gliderwill not boost really high, but it will have an easier ride up. Witha reasoanble choice of big rocket and piggyback glider, this is afairly reliable way to go.
One engine choice to consider is be a D9-4 reload. The thrustcurve puts a bit less stress on gliders than a D12, and is a full Dengine. Drawbacks are the need for a reload casing, and that the 4second delay may be a bit long for some gliders.
Attention R/C Fliers: Please check out the NARAM-50website's RangeRules Page for procedures involving Frequency Control and flyingof R/C models during NARAM, both in competiton and Sport flying.
Update note: Greg Stewart has converted a small R/C sailplane, theBlue Arrow "Venus" to be capable of flying on D and E engines. Theconversion is posted to the R/C Groups discussion group, and titled:Mini-HowTo - Converting BlueArrow Venus DLG to Entry Level Competition D/E Rocket Glider.Now, you really NEED to learn and know how to fly R/C first beforeyou could safely be able to boost and fly this model. So if you arenot into R/C, it is pretty much too late for you to try this in timefor NARAM.
The following are General Tips for Boost Glide, regardless ofengine power:
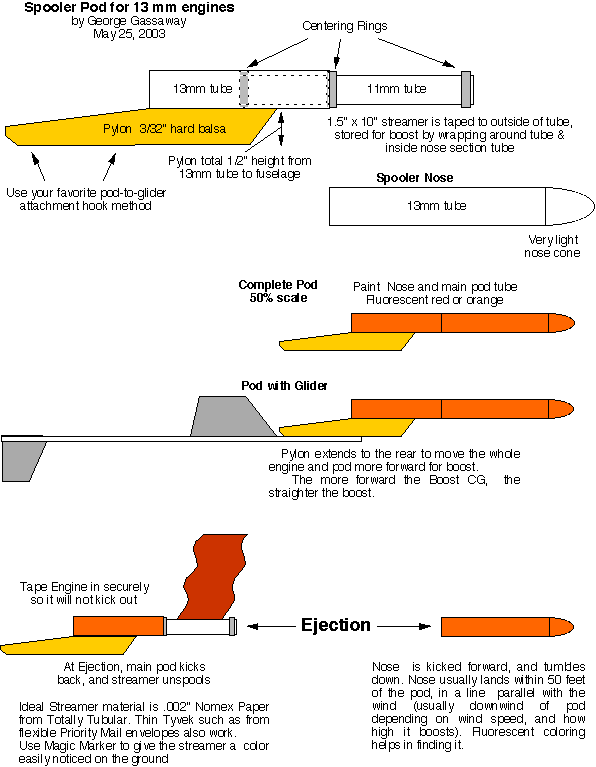
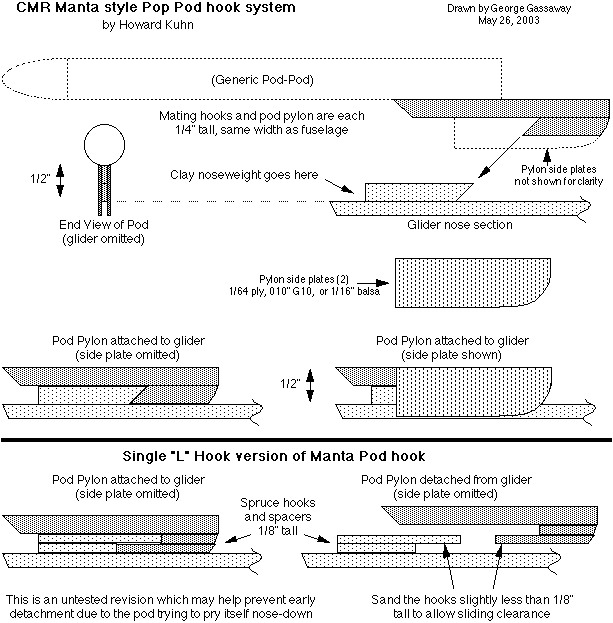
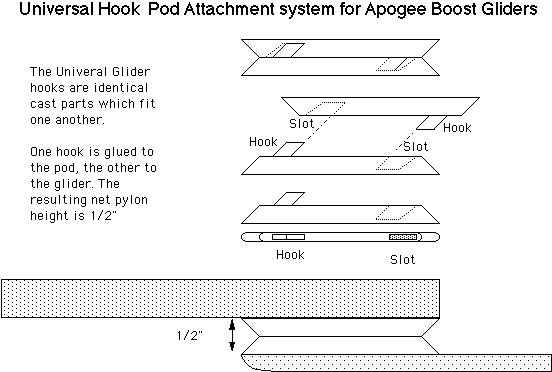
| Pop-Pods - Nearly all B/G's use pop-pods. These are short finless bodies that have the engine, launch lugs, and usually a streamer for recovery. They attach to the glider using some sort of hook system, so they carry the glider up during boost then at ejection kick backwards to separate from the glider. Spooler Pop-Pods - Sometimes, the shock cord or streamer on a pop-pod gets hung up on the glider, causing a tangled "Red Baron" descent to the ground. The "Spooler" pop-pod design eliminates shock cords, and delays streamer deployment until the pod has left the glider. It works by having the streamer rolled up (spooled) inside so it cannot deploy until after the nose section has been ejected off (the nose tumbling down safely, usually painted a fluorescent color to aid in finding it). Click here for a drawing that shows the Spooler pod design for 13mm engines. Pod hooks - Various kits and plans show different types of pod hook or pod attachment methods. Unless the glider is somewhat unique, you can usually use your favorite pod hook method on any given boost glider plan as long as you maintain the pylon height between the top of the fuselage and the pod tube (on most gliders, the pylon height is 1/2"). CMR Manta Hooks - The old CMR Manta kit used a hook system that proved to be simple and mostly universal. It is easily duplicated by using spruce for the hooks and thin plywood or G10 fiberglass sheet for the side plates. Click here for a drawing showing more details than at right. Apogee Universal Glider Hooks - A single cast part design which has a hook and a slot, which fits with an identical cast hook and slot part (see drawing at right). One is glued to the pod, and one is glued to the glider (these were originally developed for the Maxima glider kits). Any glider can fit any pod, since the hooks are all identical. Click here for a drawing showing more details than at right. The hooks are sold by Apogee. | 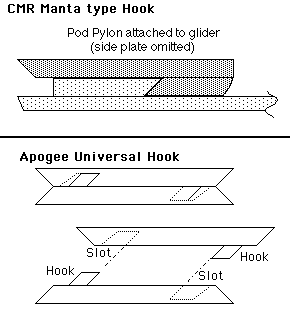
|
Building Gliders - Ed LaCroix created some fantasticinstructionsfor the Maxima A Boost Glider kit, from the time when Ed ownedand ran Apogee. The instructions are for an "A" model, but thebuilding tips and trimming tips are useful regardless of what size ofglider.
Kevin Wickart wrote a nice short article on how to do quick andeasy airfoils, on the WOOSH section's website. Clickhere to read it.
A VERY nice sanding block, useful for gliders, helicopters, andany rocket really, is an all-metal 2-piece clamp-type sanding blockmade by Red Devil, carried by most Ace Hardware stores (look nearwhere they stock sandpaper). It has a 1/8" foam rubber backing sheet,which should be removed since it allows rounding things too easily in3-D when you usually want to shape in 2-D at a given time (as with awing). So, remove the rubberized portion. That sanding block holds a4.5 x 5.5" sheet of sandpaper (quarter of a 9 x 11" sheet), with a3.5 x 4.5" sanding surface area on the block. This works far betterin most cases than a narrow sanding block. Of course, the wings (orfins) should be shaped and finished before they are glued to thefuselage or model.
When doing very rough shaping for wings, 80 to 120 grit sandpaperis good for grinding off a lot of wood in a short time. Don't over-doit though by sanding off too much. Next use a finer grit like 180 to220 for finer shaping. Beyond that, 280/320 paper, is sort of a crossbetween final shaping and setting up for a final finish. A finalfinish for bare balsa is sanding with 400 grit paper. Get the "black"type wet or dry sandpaper, it sands better and lasts longer than thereddish types. If you use any clear dope, use 320 to 400 grit paperbefore and after.
Trip Barber's D-Light B/G Planalso has a good article that describes constructon, sanding anairfoil, tissuing, Dethermalizers, and even a launcher. So even ifyou do not build this model, it is worth reading for techniques andideas.
Glider Finish - Never use paint on a contest type glider.For newer fliers, no finish is usually fine. You don 't want to weighthe model down too much and maybe having warpage problems. If youwant to improve the finish, use some thinned clear dope in one or twolight coats, sanding before and after with 240 and 400 gritsandpaper. The idea it not to add weight or cause the wood parts towarp.
Some fliers like to use a Japanese tissue finish. Trip Barber'sD-Light Boost Glider plan hasinformation how to tissue a wing.
Coloring - OK, so bare balsa (even with clear dope) is noteasy to see in the air or on the ground. Use a large black magicmarker to color the bottom of the wing and tail surfaces black, asblack shows up against the sky pretty well. Use a large red or orangemagic marker to color the top surfaces. If you can find truefluorescent markers (not to be confused with wimpy fluorescenthighlighters), an orange or red/magenta fluorescent color is highlyrecommended.
Glide trimming - It is an understatement to say that it isvery important to trim the glider to glide properly. It's not easy todescribe just how to do so.
One mostly universal tip is to have the tail of the glider and thewing to NOT be parallel to each other (there should be slightpostitive incidence). There ought to be a little bit of "up elevator"angle in the tail, relative to the wing, to make the nose pull up abit. Some plans/kits may be quite specific, and in those cases gowith what they say. Note that free flight model airplane expertssometimes prefer zero incidence, but they are deeply experienced(usually) to have just the right touch and experience to get awaywith it.
The above being said, one of the simple ways to achieve slight upelevator effect (without adding too much) is to build the modelzero-zero (wing and stabilizer parallel to each other), then warp thetrailing edge of the stabilizer up. Make sure that the fuselageitself is not warped "down" - if it is warped at all, better to bewarped "up" relative to the wing and stabilizer.
Here are a few links for trimming tips from a number of differentsources:
EstesBoost Glider Technical Report, written by Tom Beach (pdf filefrom Estes Educator website). An excellentarticle with many illustrations, that cover a wide rangeof areas involving Boost Gliders and Rocket Gliders, includingtrimming. HIGHLY RECOMMENDED.
Kevin McKiou's Basics of Design andTrimming of B/G's and R/G's. Items 1 thru 5 are useful only ifyou are designing your own, or modifying an existing plan/kit. Items6 thru 9 are useful for trimming gliders for optimum glideperformance.
Again, Ed LaCroix's instructionsfor the Maxima A Boost Glider has trimming tips. The instructionsare for an "A" model, but the trimming tips and some other gliderassembly tips are useful.
Hand LaunchGlider trimming tips for beginners, from a British Free Flightmodel airplane site. The latter portions about hard throws (necessaryfor contest HL gliders) is not too relevant for rocket boostedgliders (since the F/F HL glider flyers's hard upward throws aretheir equivalents to our rocket "boosts"). Note the basic glide triminfo and illustrations at the top of the page.
Launching - Set up the glider on the pad so that it facesinto the wind. This means the wing bottom faces upwind, and the wingtop faces downwind. Actually the dihedral effect will usually try tomake the glider face that way.
Apply a flag of masking tape to the launch rod, so the flag holdsthe pop-pod high enough for the glider tail to not be touching thebottom of the launcher. Some people prefer to make their own gliderlauncher that has the launch rod mounted onto a 3/8" or 1/2" dowel,so that the whole rod can be used for guidance.
A classic launch problem is for the micro-clips to fall atignition to grab onto the glider wing or tail, causing damage or evendisaster. Some prefer to tape the clips to the rod so they can'tfall, which is effective but a bit messy. Others like to use anumbilical approach. They arrange for a separate launch rod, dowel, orother structure to hold the micro clip wires away from the glider, sothat when the clips fall they will not fall straight down, but willswing away in an arc from the glider. A simple umbilical is to use apiece of 1/4 x 1/4 spruce 18" long or so, and cut the bottom at avery sharp angle that is about 30 degrees from vertical. Then glue alaunch lug to the angled part. That way, the spruce umbilical can beslipped over the launch rod, umbilical angled at 30 degrees from therod, ready for the micro-clips to be attached to it. Put your name onit, since the next person to use that pad will probably want toremove your umbilical.
More Information:
| Engine recommendation for D Boost Glide: | D12-3 (for models able to hold up to a D12 on boost) |
| | D10-3 (for models able to hold up to a D10 on boost) |
| | D9-4 reload (Less stress than a D12, 4 second delay might be a bit long) |
| | C6-0 staged to C6-3 (for models that can boost straight and not strip the pod at staging) |
| | C6-3 clustered with 1/2A (for "bumping" C6 models into D class. The C6 would need to be by Estes, the Quest C6 plus 1/2A would NOT be over 10 N-sec ) |
| | D7-RC reload (for R/C R/G models) |
| | D11-P (for R/C R/G models that use plugged engines, which can hold up to a D11) |
return to top
Last Updated 5/28/2008